|
3.0.0.0 Service Pack 3 |
Welcome to release 3.0.0.0 Service Pack 3. There are many new enhancements in this release. Please review the release video as it will provide an overview of the enhancements. Also, there are additional videos for certain enhancements. Please click on the links for further details.
CLICK HERE --- >>>> RELEASE 3.0.0.0 Service Pack 3 OVERVIEW VIDEO <<<< --- CLICK HERE
Share The Wealth – Have you created phrases for your system? Did you know you can share your phrases with the rest of the ChiroWrite community? Phrases are easily shared from the Administration > WorxPhrase menu. Simply click on the phrase and click the “Share Selected” button. Sharing phrases will allow other DC’s to download your phrases into their ChiroWrite system and you can download phrases that have been shared by other DC’s. We hope every DC will take advantage of the opportunity to help a colleague and share what they have created. If you would like to share but are not certain how, please contact us and we will help you get started.
Today's Treatments, Plan, Diagnosis as List Instead of Sentence - Chirowrite now has the ability to print today's treatment, plan, and diagnosis as lists instead of sentences. In order to enable this feature click Administration > System Configuration > Defaults > Printing 2.
To print treatments, diagnosis, or plans as a list, place a check in the respective check box. Once you have made your adjustments, click Save, and click Close.
Zip Backups - Currently all Chirowrite backups are saved as .dmp files, now we have the option of also saving the backup file in .zip format. To enable this option, click Administration > System Configuration > Backup/Restore
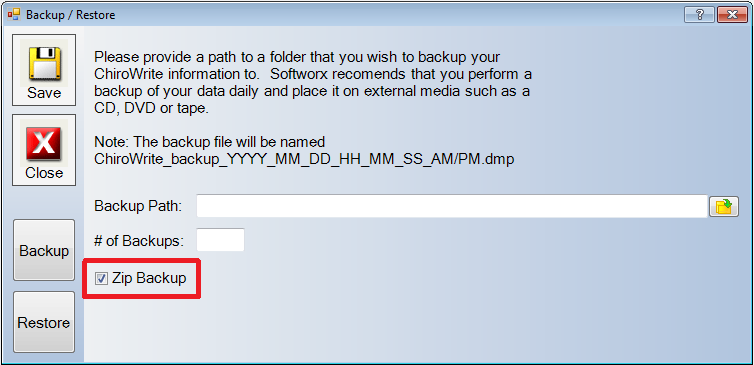
Click the Zip Backup option. Once you have made your adjustments, click Save, and Click Close.
Custom Options For Past, Current and Family Conditions - Chirowrite now has the ability to have custom conditions for Medical History Past, Current, and Family Conditions. In order to add custom conditions click Administration > System Configuration > Custom Medical Conditions.
To add a new condition click New.
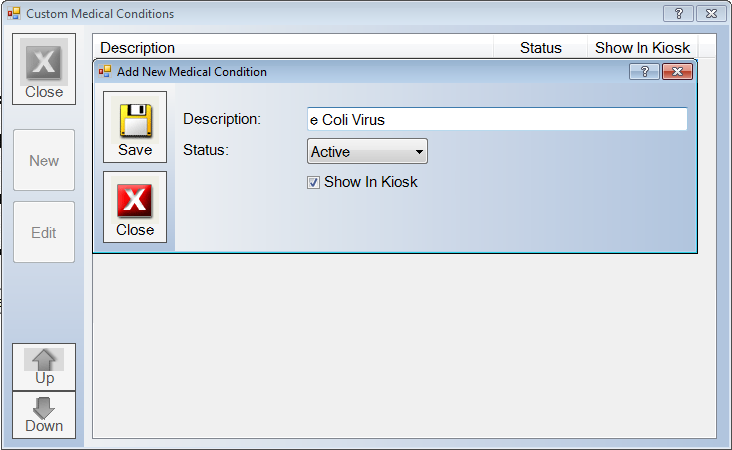
Type the new medical condition in the description box. and set the Status to Active. Additionally, if you would like this custom medical condition to be present on the kiosk screen for new and existing patients, simply click the Show In Kiosk option. When you are finished making your adjustments, click Save, and click Close.
The new custom medical conditions will be found in the History Assist/Medical Conditions area described in the prior section.
You will now see the custom options available to be selected.

Make necessary adjustments and click the Exit Workflow button when you are satisfied with your changes.
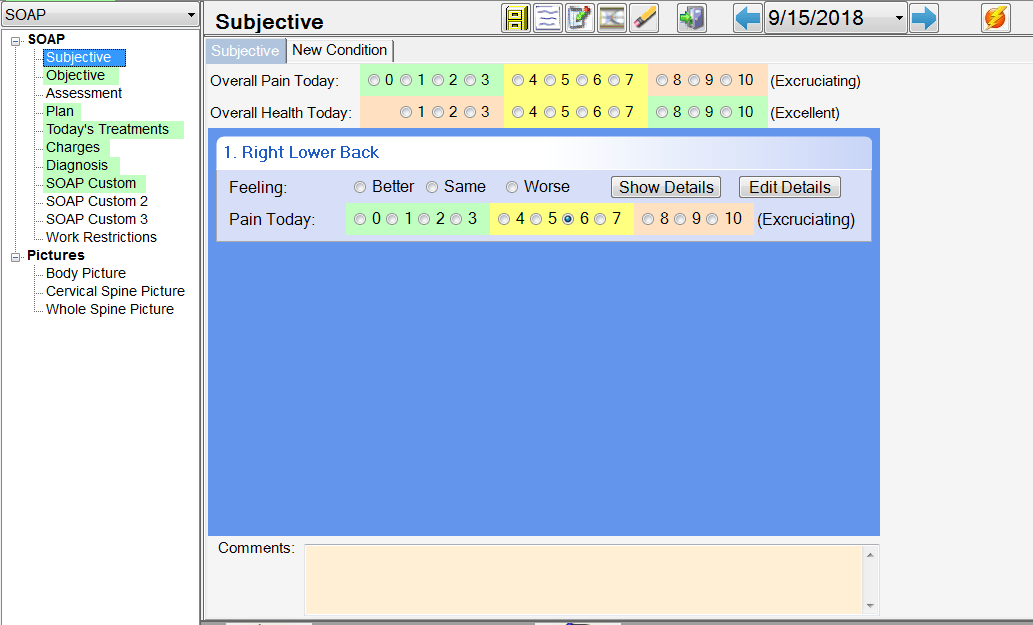
Plan Start Date and Counter - Chirowrite now has the ability to keep track of how many visits are left on a specific plan. This information can also be printed on SOAP notes. To enable this option click Administration > System Configuration > Defaults > Global 5.
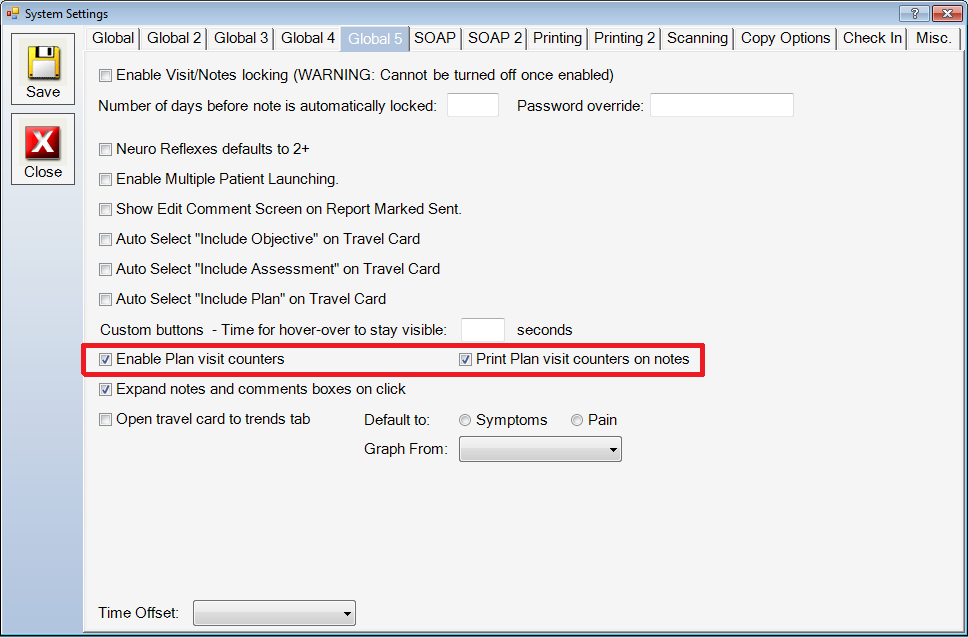
To keep a visit count of a certain treatment plan in your SOAP visits click the Enable Plan Visit Counters option. To enable the plan count to be printed on SOAP notes click the Print Plan Visit Counters on Notes option. Once you have made your adjustments, click Save, and click Close.
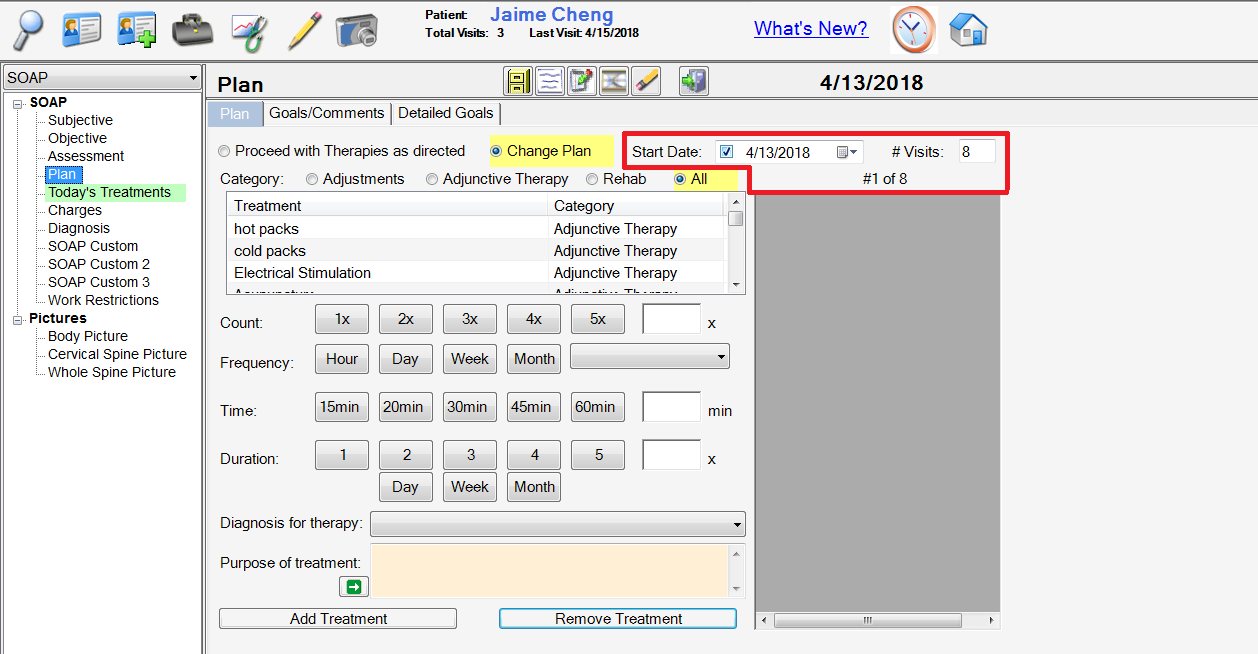
The Enable Plan Visit Counter option can be utilized on the plan screen. To start the count, enter the start date of the plan, and how many visits this plan will be in effect for.
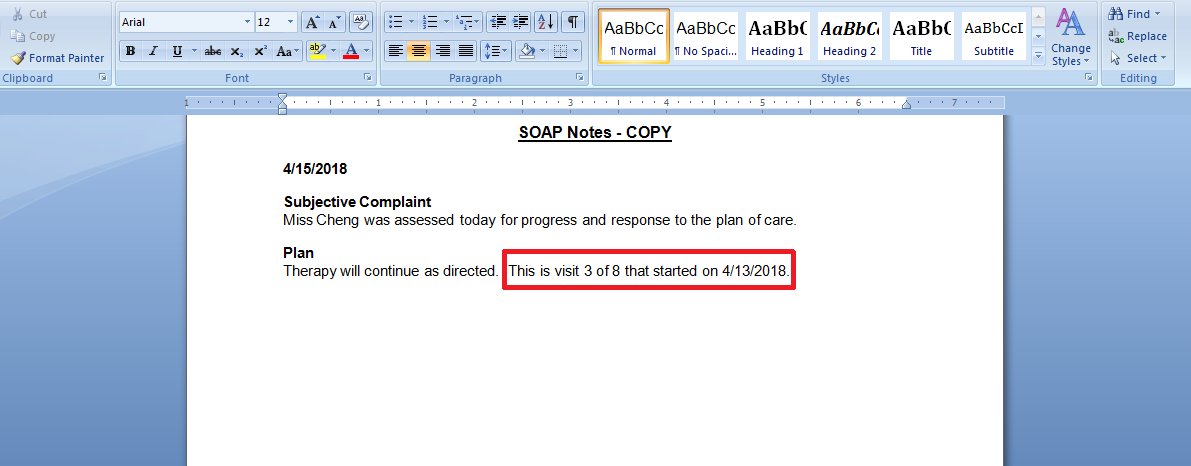
If you selected the Print Plan Visit on Notes option, the visit count information will print on the SOAP notes as displayed above.
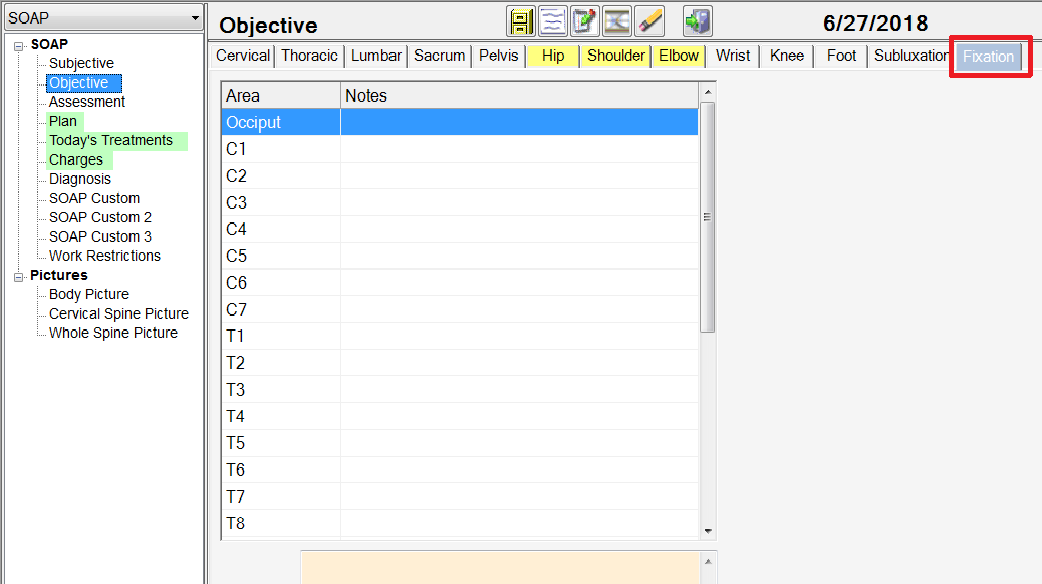
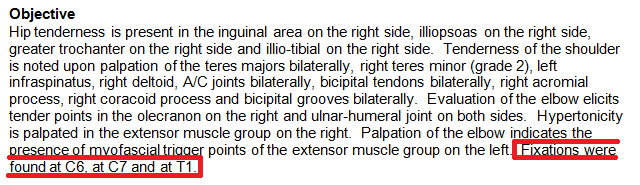
Fixation - Chirowrite now has the ability to designate fixations in the Objective section of your SOAP or Exam notes. The new tab is found in the Objective section.
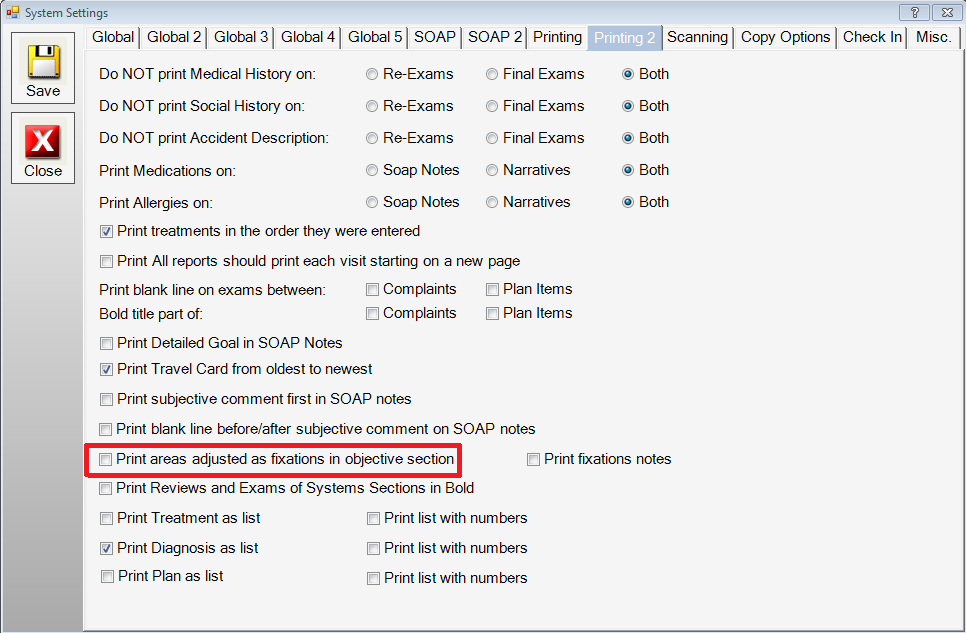
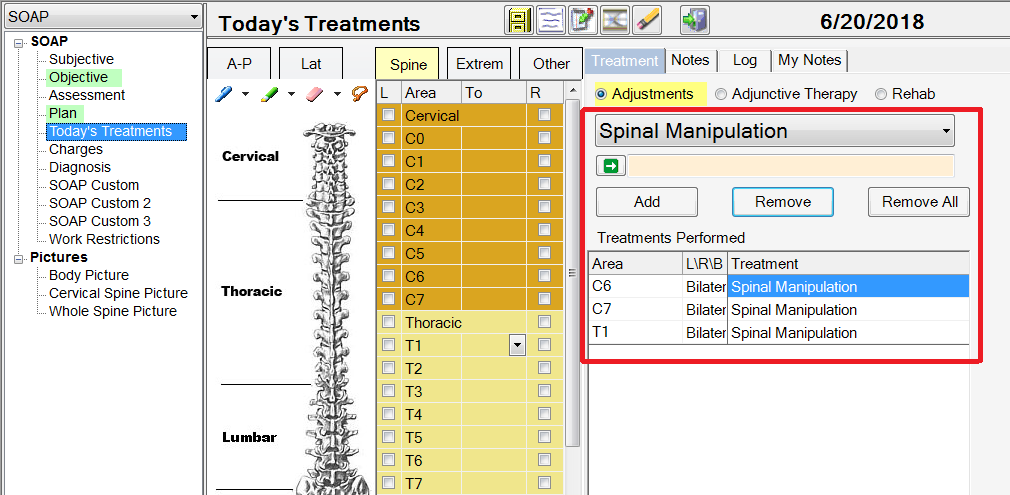
Print Adjustments As Fixations - Chirowrite now has the ability to streamline the process of printing fixations on SOAP notes. Chirowrite has added an option to print all adjustments as fixations in the objective section of your SOAP notes. This eliminates the need to add your fixations in the objective tab of the SOAP note. To access this option click Administration > System Configuration > Defaults > Printing 2.
To enable the option to Print areas adjusted as fixations in objective section, click the Print areas adjusted as fixations in objective section option. Once you have made your adjustments, click Save, and click Close.
Now if you are in a SOAP note, you only have to go to the Today's Treatments tab and click on the areas that you adjust. They will automatically print on your SOAP notes as fixations in the objective section.
There is also the ability to print the fixation notes as well. To access this option, click Administration > System Configuration > Defaults > Printing 2.
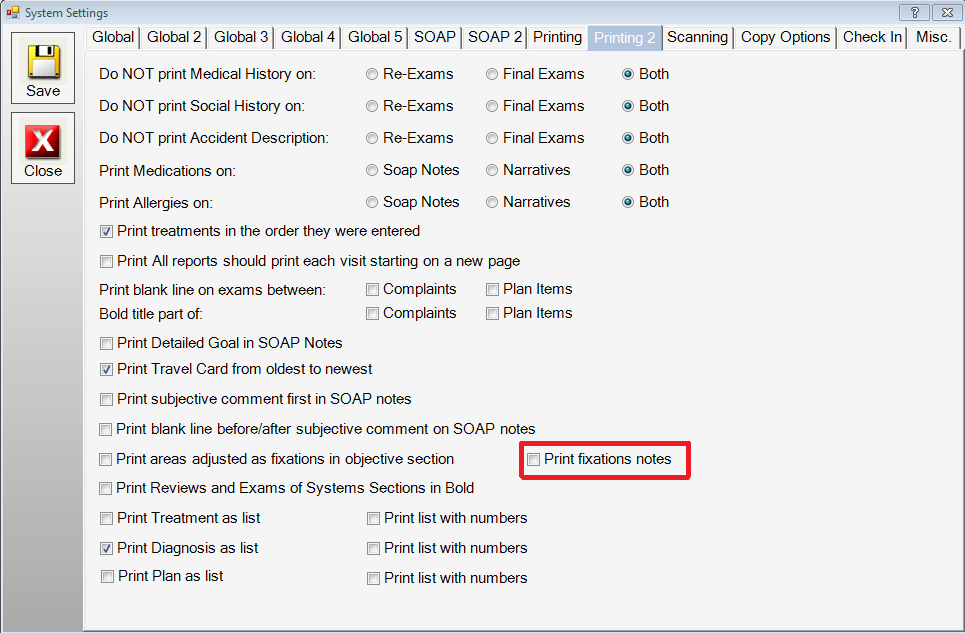
Place a check mark in the print fixations notes check-box. Once you have made your adjustments, click Save, and click Close.
Employee Time Tracking - Chirowrite now has the ability to track employee hours on a daily and weekly basis. In order to set up this feature properly, each employee should have their information entered in the employee section, and have a pin assigned. To do this click Administration > Employees.
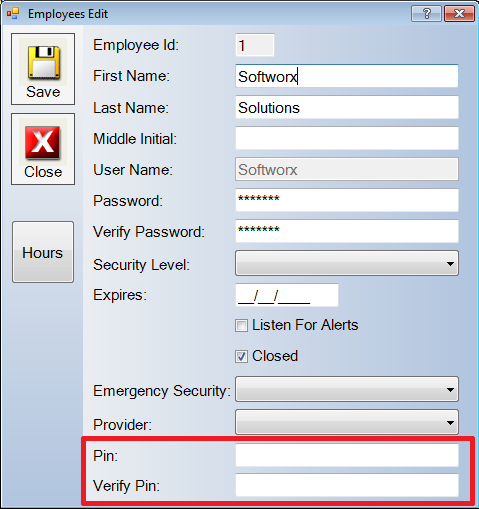
Once you have designated a pin for your employee click Save, and click Close.
To access the employee time sheet click File > Check In/Out.
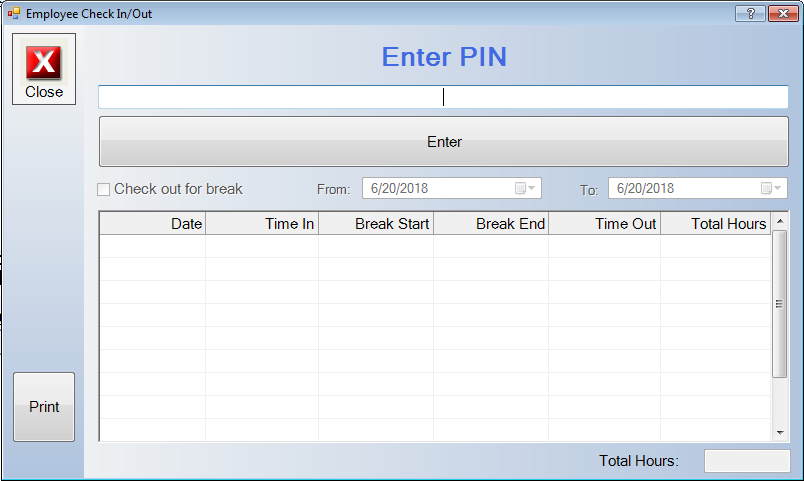
To clock the employee in, enter the employee's pin number and click Enter.
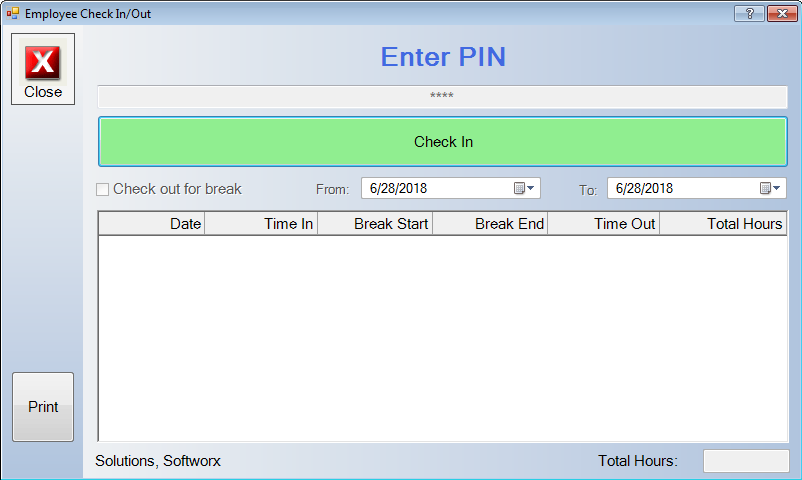
You are now presented with the option to Check In. Click the green Check In button to start recording your hours.
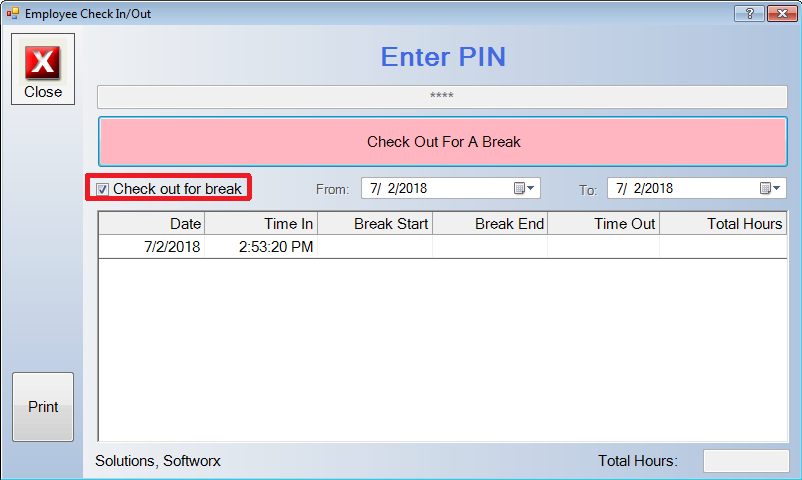
If you want to check out for a break, you can do so by placing a check in the Check out for break box then clicking the red Check Out For A Break button.
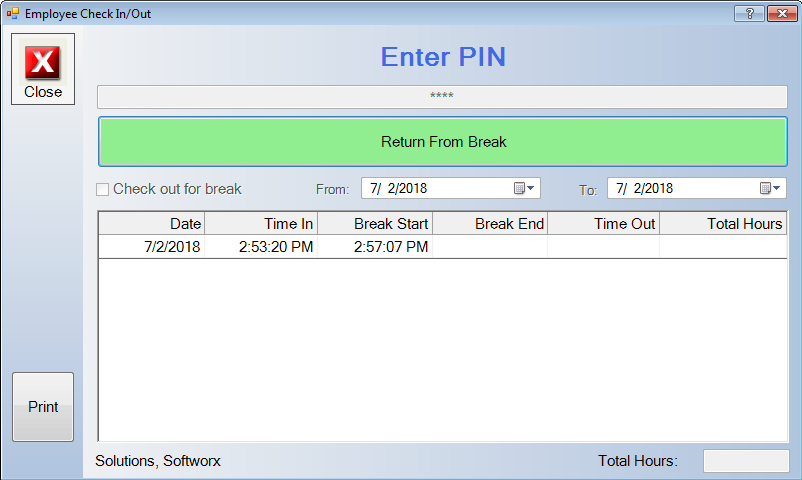
To check back in from a break, simply click the green Return From Break button.
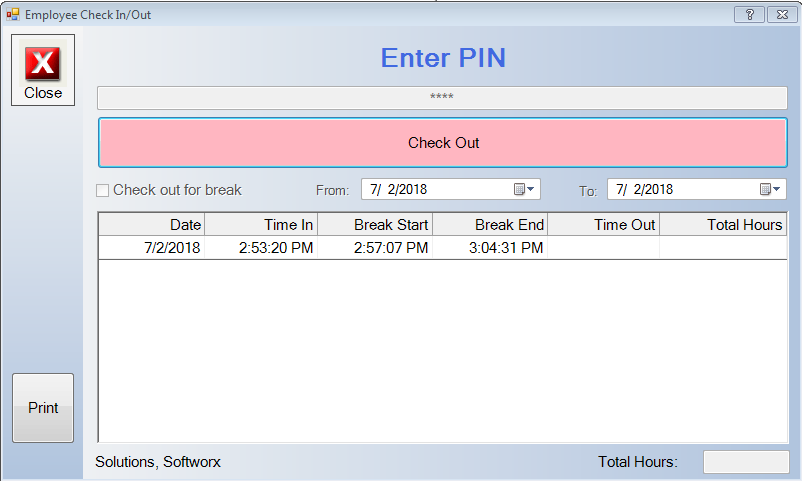
To check out for the day, simply click the red Check Out button.
You can set your pay period start date and duration of the pay period by clicking Administration > System Configuration > Defaults > Misc.
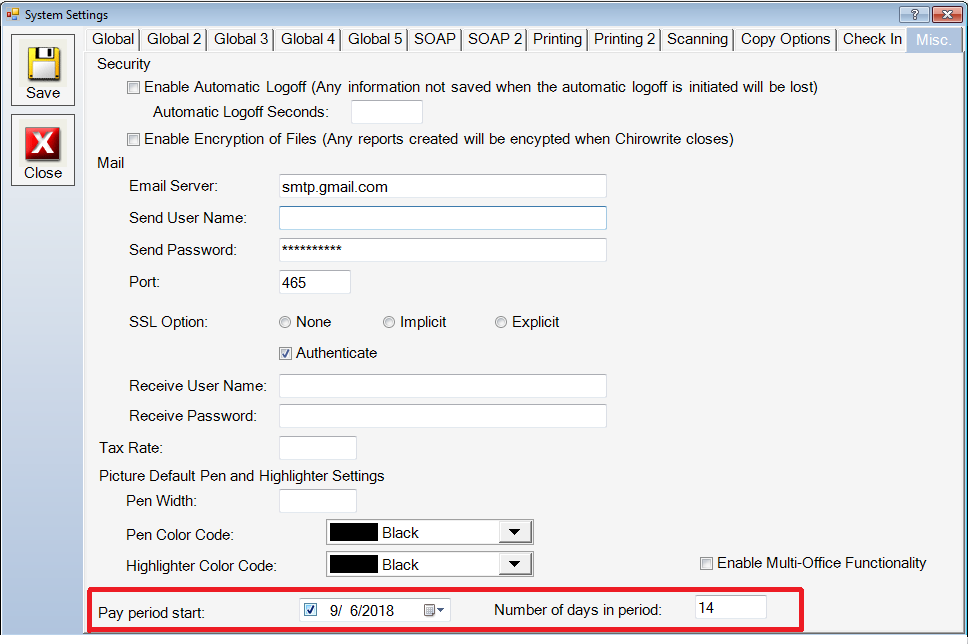
Once you have made your adjustments, click Save, and click Close.
Editing Timesheets - Chirowrite now has the ability to edit hours of your employees in case there are any mistakes. In order to edit an employees hours, click Administration > Employees, then select the employee that you need to edit.
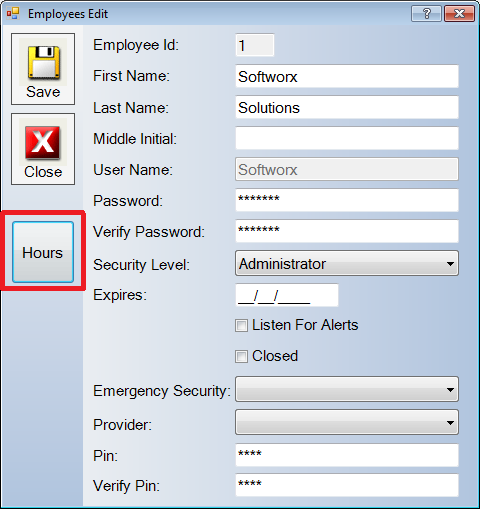
To edit the Hours, click Hours.
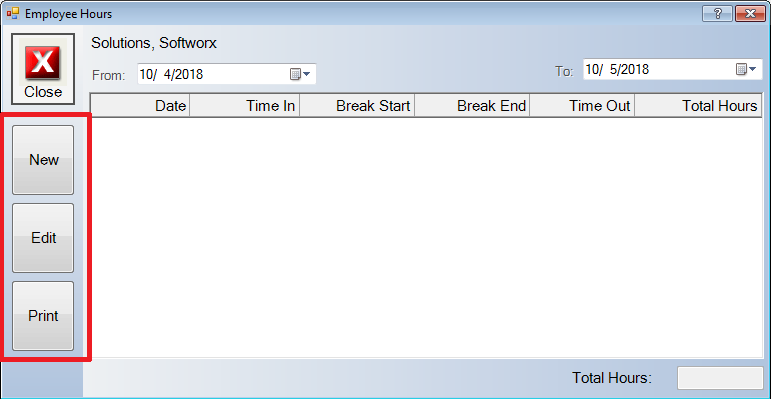
In order to add new hours, click New. If you need to Edit hours that are already entered, click Edit. And If you need to print out the current hours, click Print.
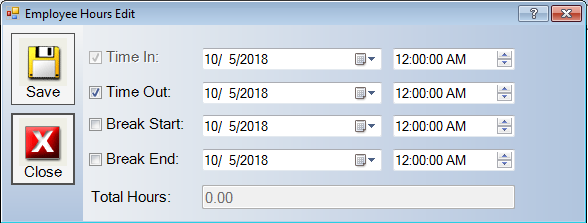
Make the necessary adjustments in the Employee Hours Edit screen, when you are finished click Save, and click Close.
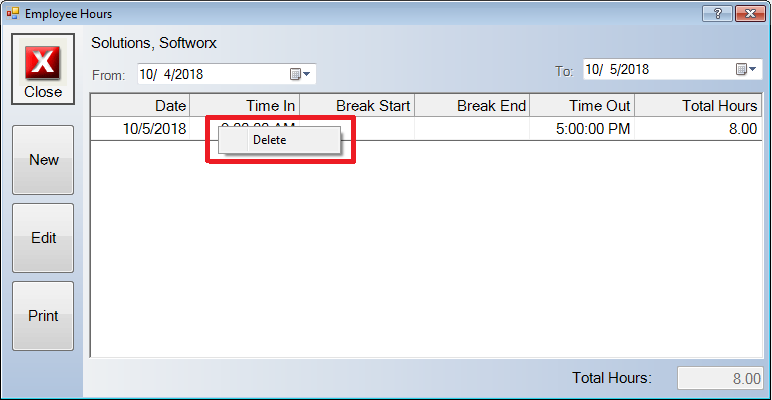
If you have made a mistake and you need to delete an entry, you can right mouse click the line that you need to delete, and click Delete.
Group Charges - Chirowrite has added a new feature for our providers who frequently use the same group of charges for a large amount of their patients. This feature allows you to name groups of charges, so that you can get all the charges for a patient with one click.
To get to this feature, click on Administration > Billing Codes > New.
.png)
You will see the new clickable option labeled group charge. Enter your new billing code, alternate code, description, and click the check-box for Group Charge. Once you are finished making adjustments, click Save, then click Close.
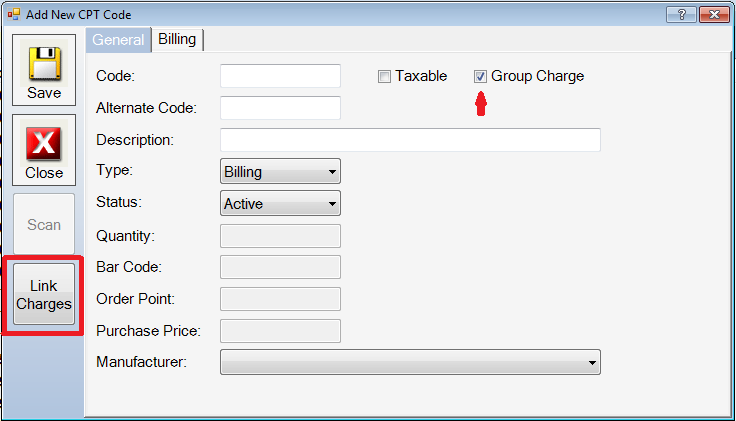
The option to Link Charges will now be available to be clicked. In order to choose the charges that you want to link together, click Link Charges.
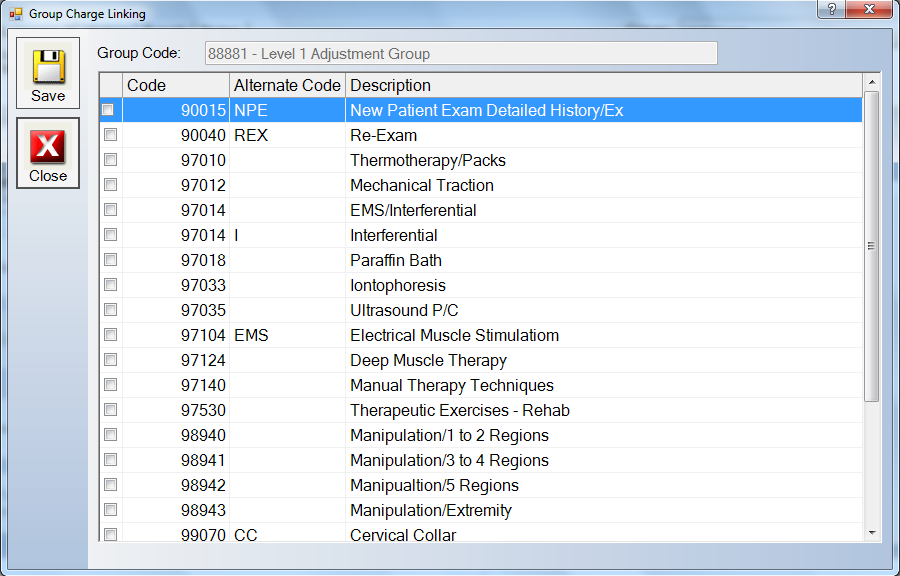
You will now be able to choose the charges that you want included in the group you have made. When you have made your selections, you can click Save, then exit out of the Billing Codes screen.
If you export charges to another billing system, there is an option to split the group charge into individual charges either before or after export. This can be found by clicking Administration > System Configuration > Defaults > Global 4.
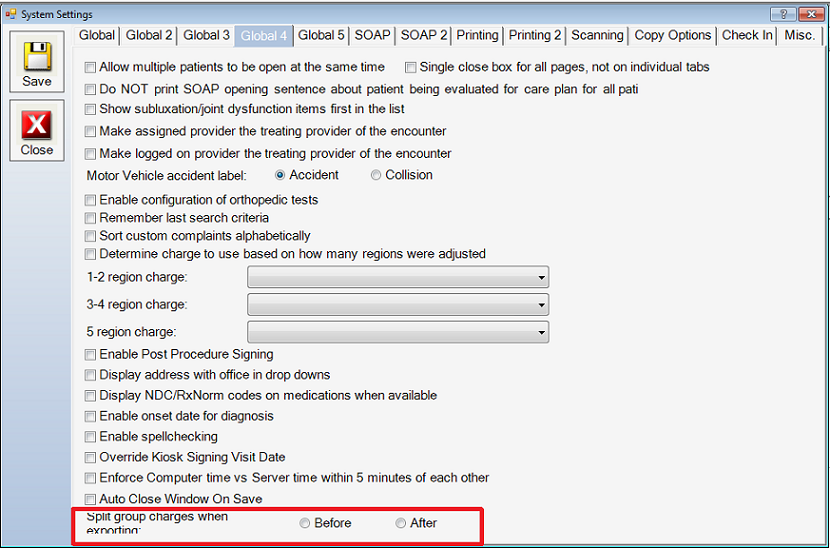
You can choose whether you want the group charges to be split into individual charges before or after export. After you have made your selection, click Save, and Close.
Adding Lawyer and/or Adjuster to a Case - Chirowrite now has the ability to store the name of the lawyer and/or an adjuster that is associated with a particular case.
In order to add a lawyer to a case, you must first add the lawyers information, and also designate that person as a lawyer. To do that, click Administration > Contacts > Referrals and General Contacts > New.
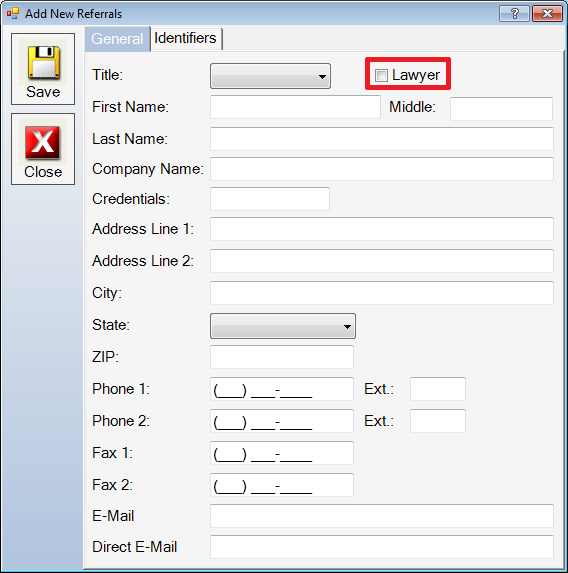
Fill in all pertinent information, when you have filled in the lawyer's information, then click the check-box for lawyer, click Save, and click Close.
* A program restart is necessary for this change to take effect.
Once you have designated your contacts as lawyers, you can now edit you case information to reflect if there is a lawyer and/or an adjuster associated with the case.
In order to do this you can click the Doctors Bag icon > Edit Case.
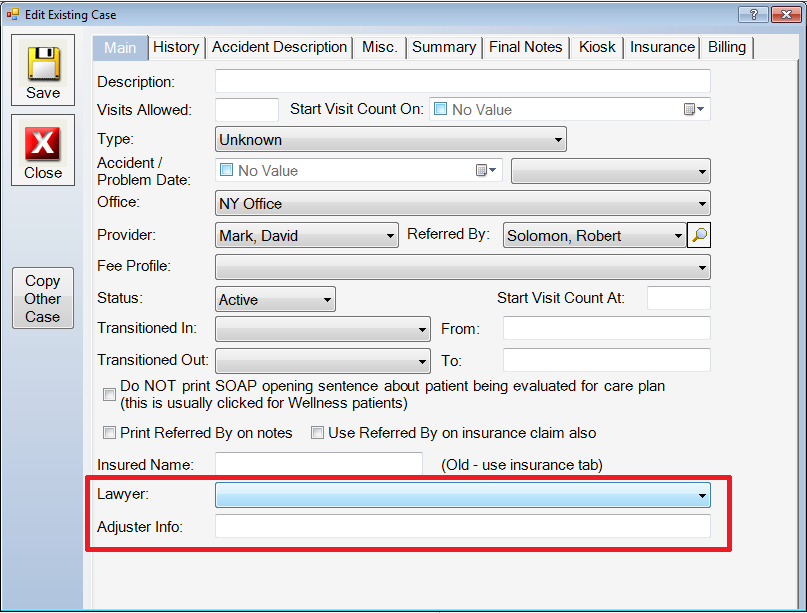
If you are entering Adjuster information, you can simply type it into the box assigned to Adjuster Info. If you are entering information about a Lawyer that is associated with the case, You can click the drop down list, and select a lawyer from the list. When you are finished making adjustments to the case information, click Save, and click Close.
Custom Hover Info on Custom Buttons - You now have the ability to determine the length of time that the information about a custom button is shown when you hover over it. In case you don't know what each custom button actually does, you can hover over the custom button and read the information that it collects.
In order to change this information, click Administration > System Configuration> Defaults > Global 5.
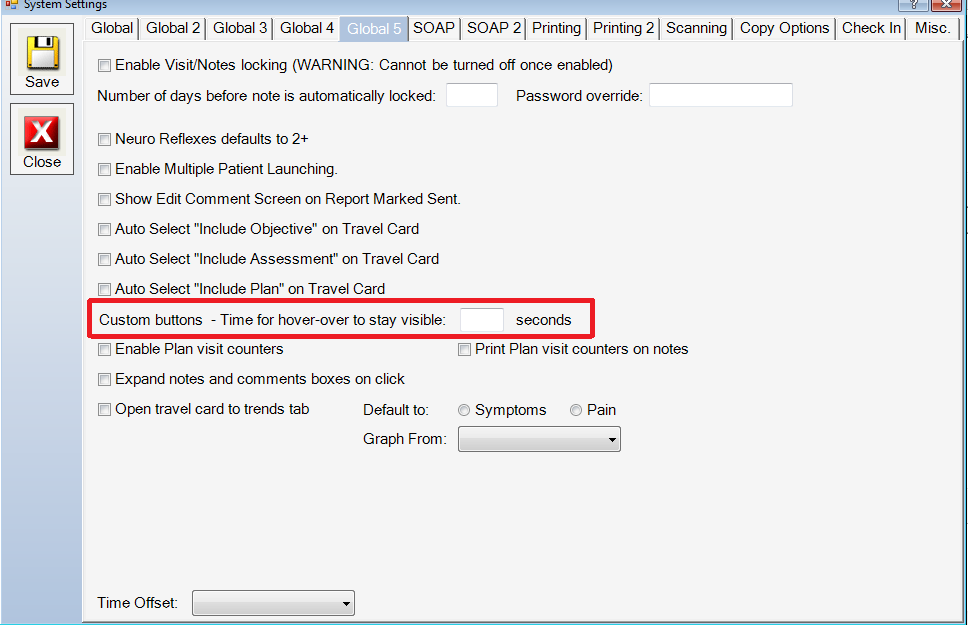
You can enter the desired amount of seconds that you want the custom button information to be displayed in the Custom Button area. Once you have made your adjustments, click Save, and click Close.
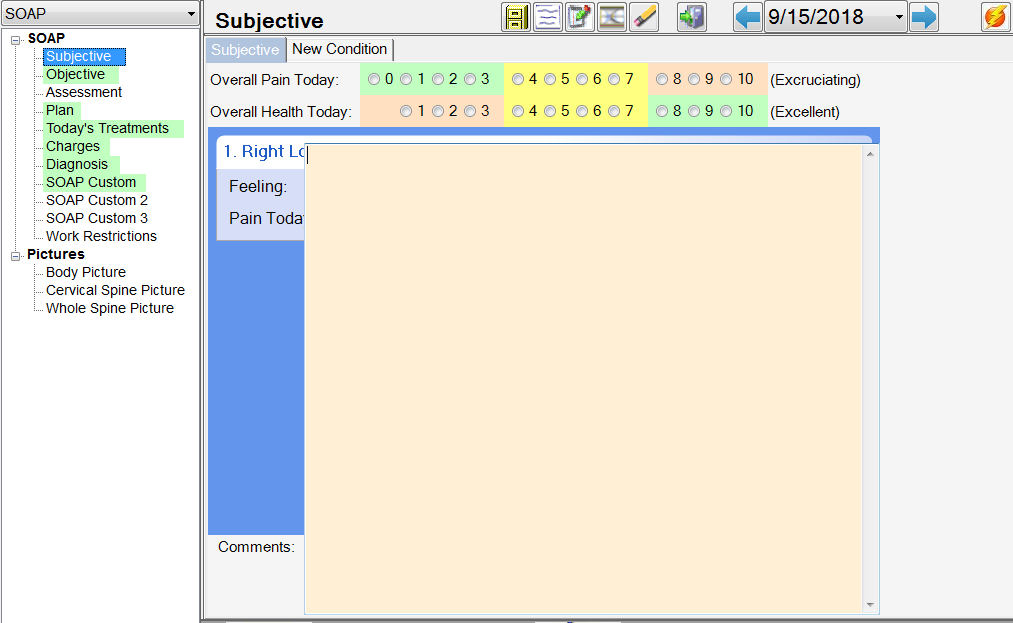
Expand Comment Text Box On Click - Chirowrite now has the ability to expand all comment boxes once you click inside them. This is so that you can see more of the text that is in the box. To enable this option, click Administration > System Configuration > Defaults > Global 5.
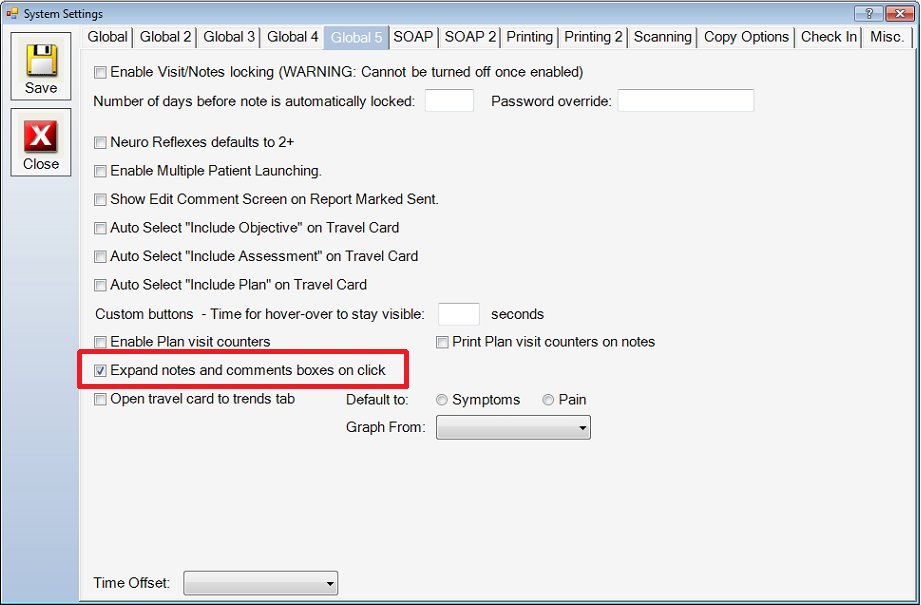
Click the Expand notes and comments boxes on click option. Once you have made your adjustments, click Save, and click Close.
Now in your notes, if you are presented with a peach colored box where you can add your own notes.
Simply click in the peach colored box to expand the comment box.
New History Tab For Past Conditions - Chirowrite now has the ability to record past conditions. This new screen can be found in the case level options. Click the Doctors Bag, then select the case that you need to add past conditions, select Edit Case. Select History then click the History Assist button.
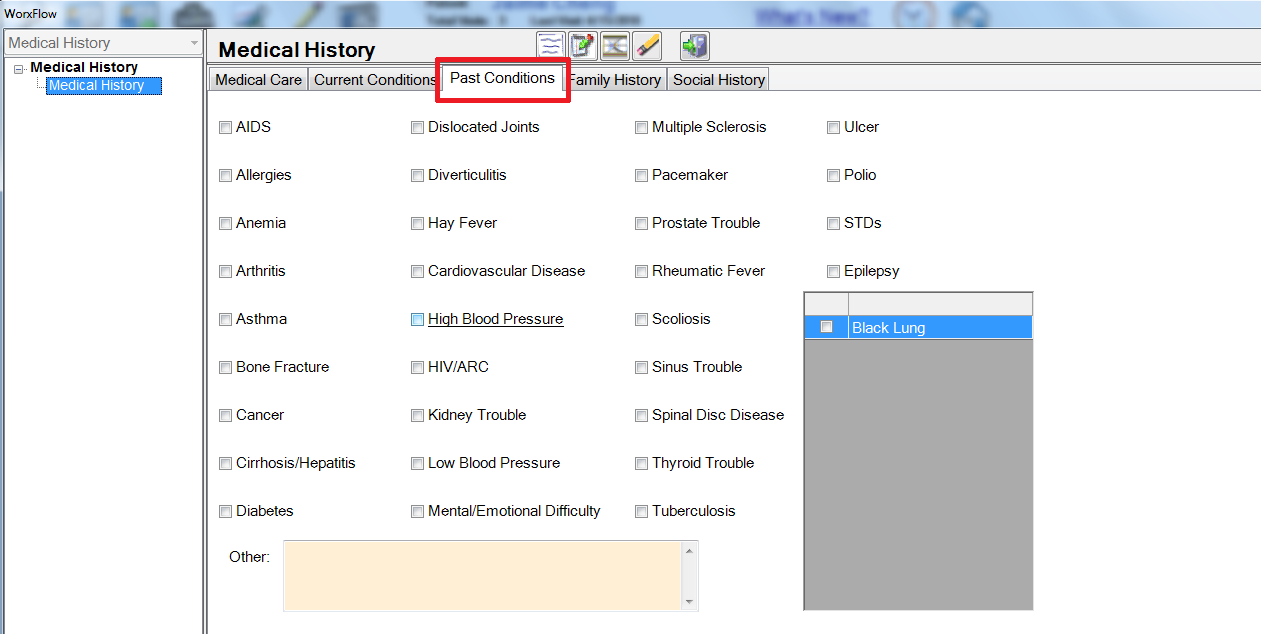
You will notice the Past Conditions tab in the list of available tabs. Make necessary adjustments and click the Exit Workflow button when you are satisfied with your changes.
Print Subjective Notes at the Start of a Note - Chirowrite now has the ability to add the subjective notes at the beginning of the SOAP notes. You can enable this option by clicking Administration > System Configuration > Defaults > Printing 2.
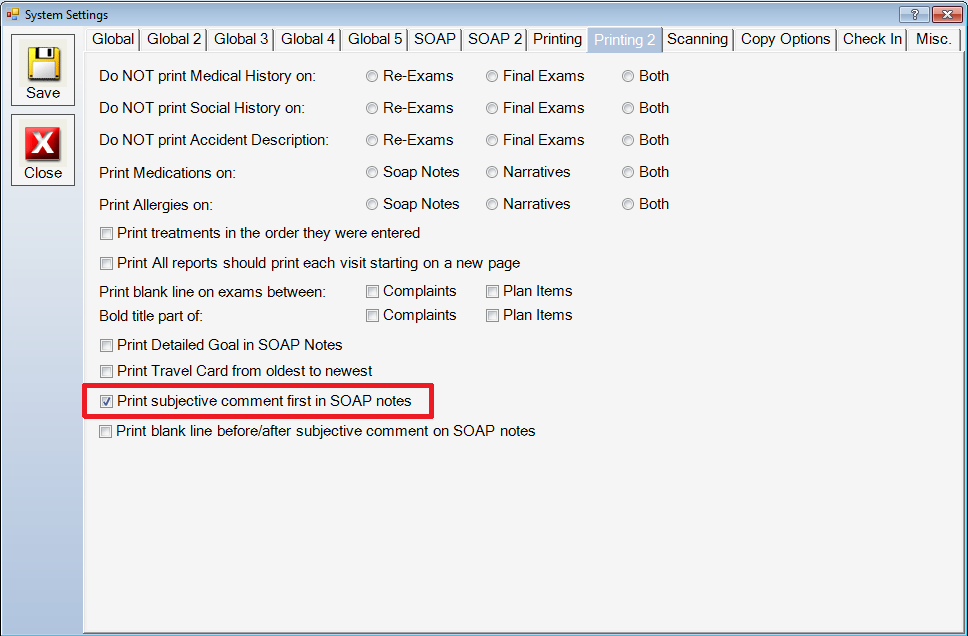
To enable the subjective comments to be printed at the beginning of the SOAP note, click the Print Subjective Comment First in SOAP Notes option. Once you have made your adjustments, click Save, and click Close.
Work Restrictions - Chirowrite now has the ability to print custom letters as it pertains to work restrictions. This new function is available as a screen in Standard Templates.
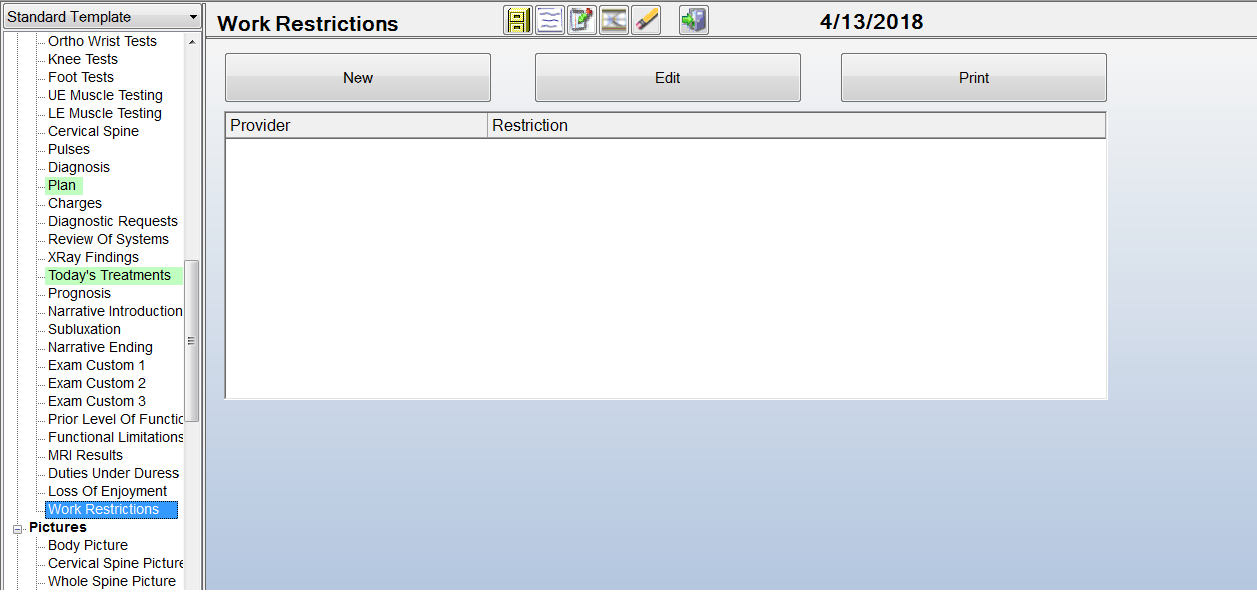
To add a new work restriction, click New.
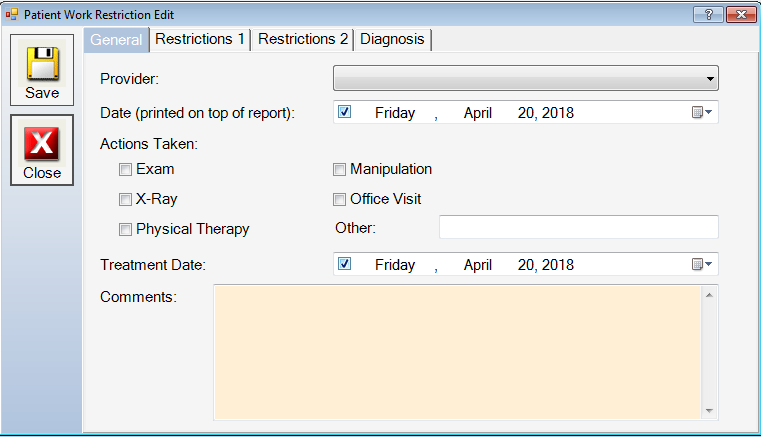
Make the necessary adjustments on the General tab, if you are finished, click Save, and click Close. If you need to enter more information, you can click the Restrictions 1 tab.
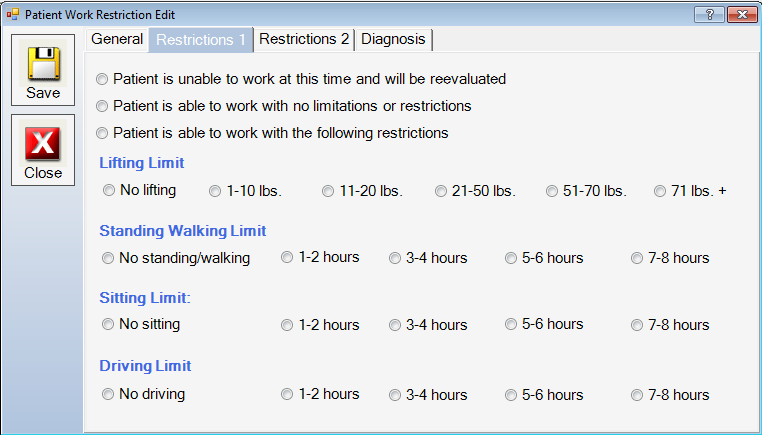
Make the necessary adjustments on the Restrictions 1 tab, if you are finished, click Save, and click Close. If you need to enter more information, you can click the Restrictions 2 tab.

Make the necessary adjustments on the Restrictions2 tab, if you are finished, click Save, and click Close. If you need to enter more information, you can click the Diagnosis tab.
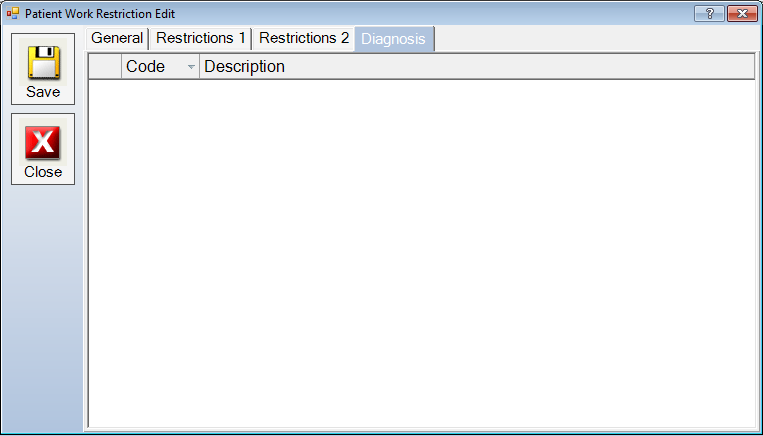
Codes are brought in from diagnostic codes from visits. Make the necessary adjustments on the Diagnosis tab. Once you are finished, click Save, and click Close.
Database Maintenance Tool - Chirowrite now has the ability to clean up the chirowrite database in order to free up more space.
*This tool should only be used by professionals who have knowledge about database structures, or by a technical support representative at Chirowrite.
To access the Database Maintenance Tool click Help > Update Configuration > Database Maintenance.
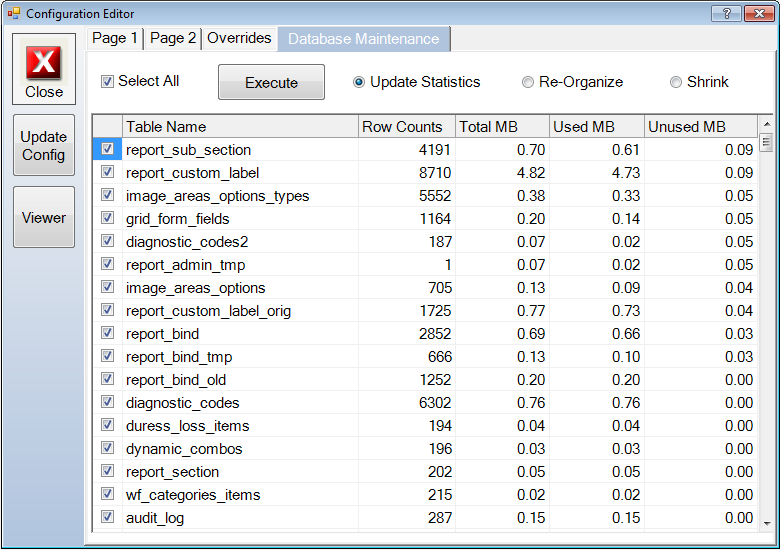
Make the necessary adjustments, when finished click Execute, and click Close.
Conditions on Case - Chirowrite now has the ability to qualify conditions on cases. This is accessed at the case level. To access the conditions screen click the Doctors Bag icon, select a case and click Edit Case, click the Billing tab.
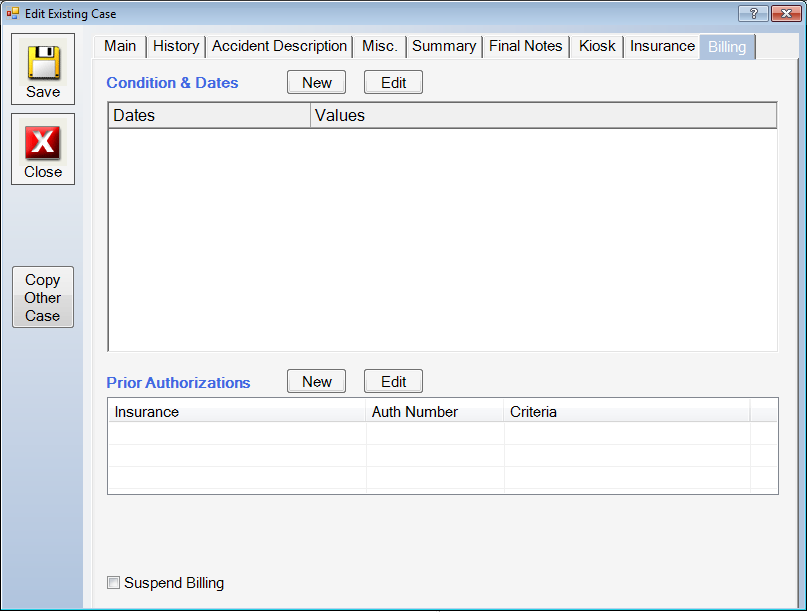
To add a new Condition click New.
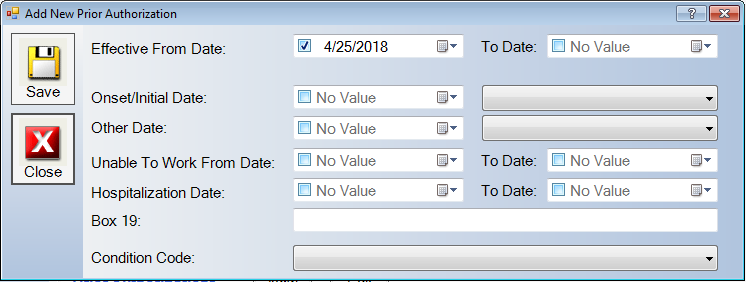
Make the necessary adjustments. When you are finished click Save, and click Close.
If you need to add a Prior Authorization you can click New in the Prior Authorizations section.
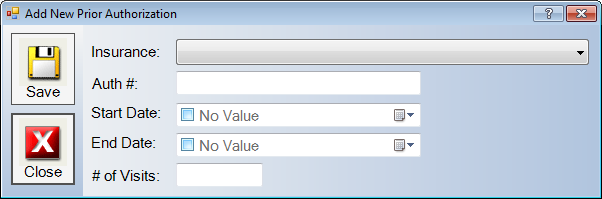
Make the necessary adjustments. When you are finished click Save, and click Close.
Print All Exam Only - Chirowrite now has the ability to print only exams through a date range. This can be accomplished by selecting Print All - Exams Only on the Reporting page.
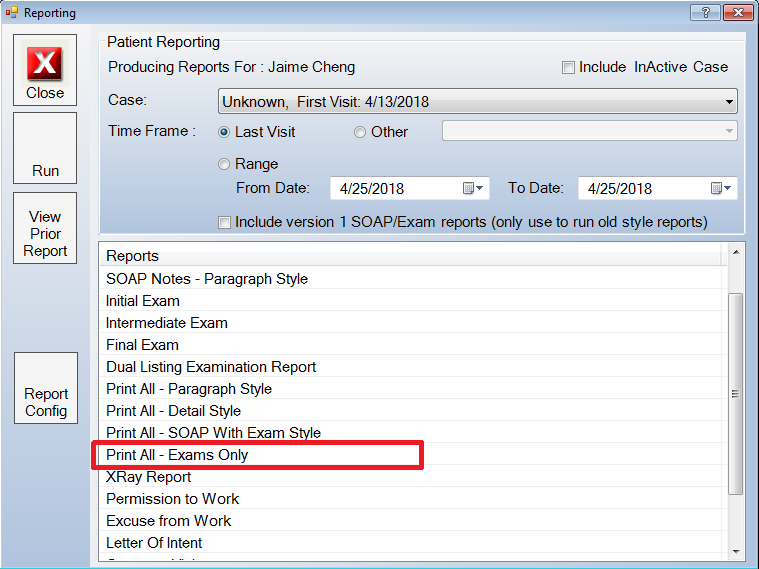
With the Reporting page open, select Range, and select a date range for the reports that you want to retrieve. Highlight Print All - Exams Only, then click Run.
Start Travel Card On Trends Screen by Default - Chirowrite now has the ability to start the travel card on the trends screen.
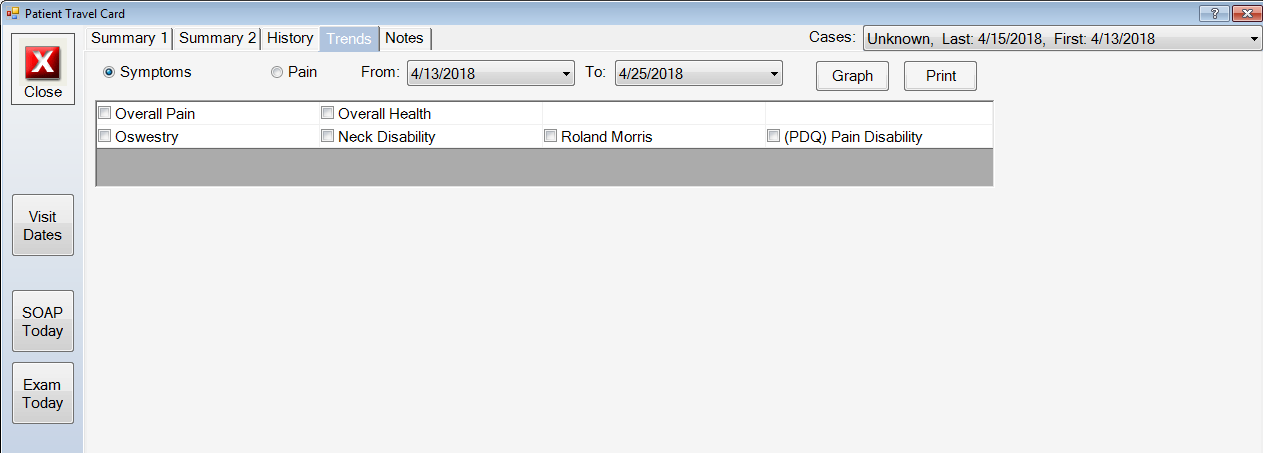
To access this click Administration > System Configuration > Defaults > Global 5.

To enable the open travel card to trends tab, click the open travel card to trends tab option. Once you have made your adjustments, click Save, and click Close.
Referred By Reports - Chirowrite now has the ability to print a report showing all referral sources. This option can be accessed in Office Activities > Reports.
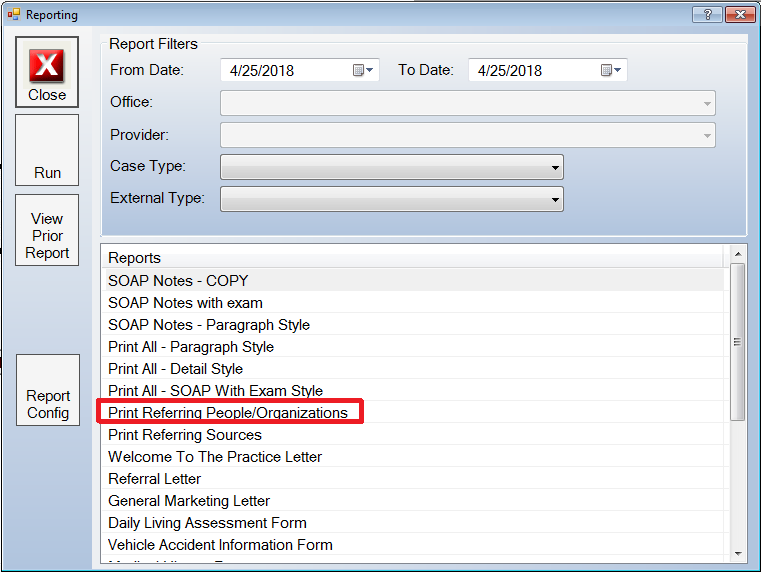
Select a date range, select a case type, select the Print Referring People/Organizations option, then click Run.
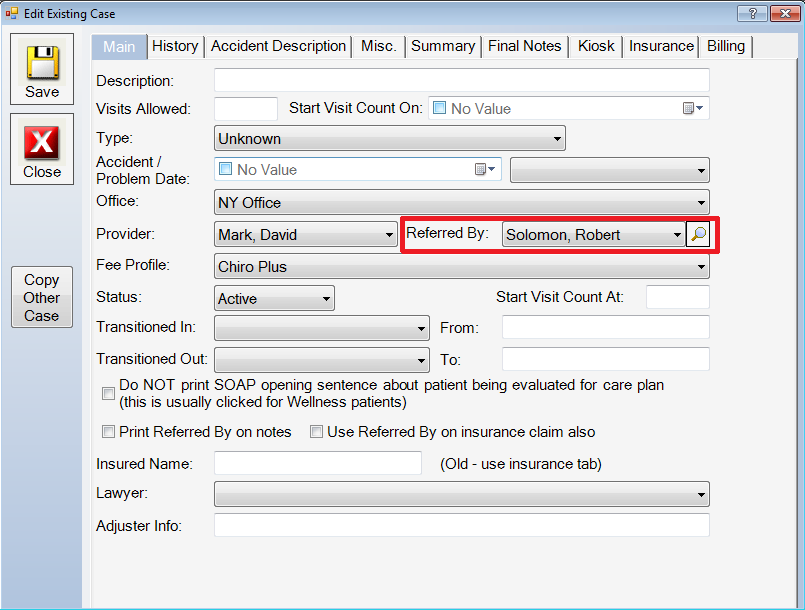
In order to add the referral information, click the Doctors Bag > Select Case > Edit Case.
Referral Source Option on Patient and New Report - Chirowrite now has the ability to add referral sources to patients, so that you can effectively track the referral sources of your patients. To add a referral source, click Administration > System Configuration > Referral Source.
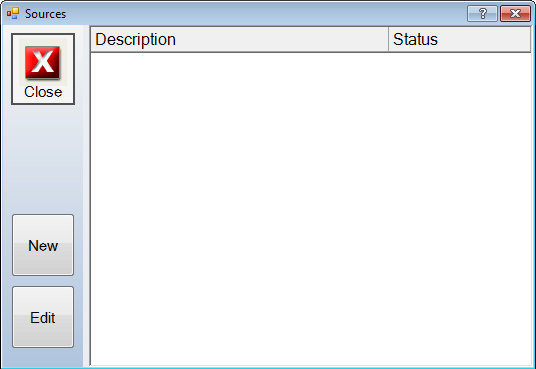
To add a new referral source click New.
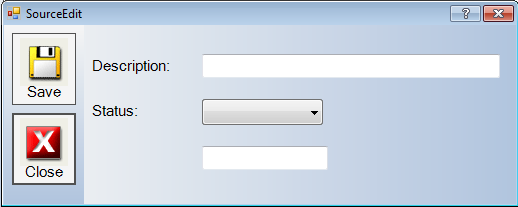
Make the necessary adjustments, when you are finished click Save, and click Close.
To add a referral source to your patient, click the Edit Patient Icon in the tool bar, then navigate to Page 2.
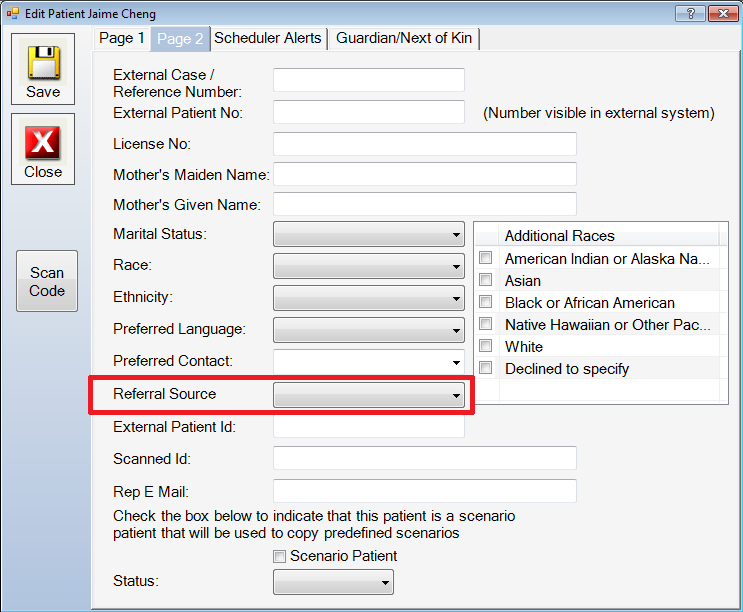
Click the drop down menu in Referral Source box and select the proper referral source. When you are finished, click Save, and click Close.
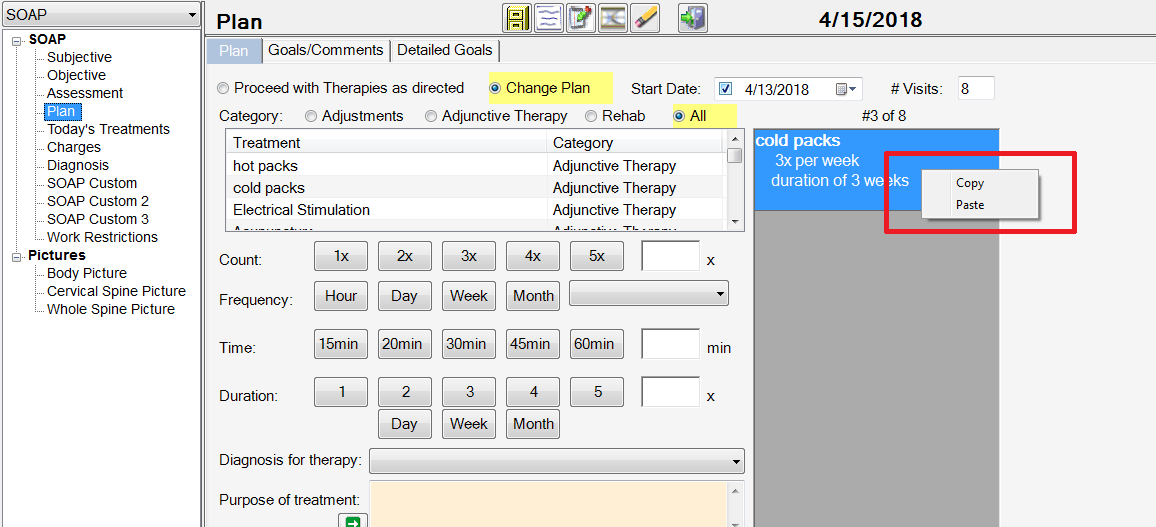
Copy/Paste Plan - Chirowrite now has the ability to copy and paste plans from one visit to another in the plan page. In order to copy and/or paste a plan, navigate to the plan page in a SOAP visit or Exam visit. Click Change Plan, now you are able to right mouse click the plan area and the option to copy or paste this section.
Copy Options - Chirowrite now has the ability to designate which areas of a SOAP note copies from note to note. The default rule is that all parts of the notes copy. You can now select the parts that you DO NOT want copied from note to note. In order to do this click Administration > System Configuration > Defaults > Copy Options.
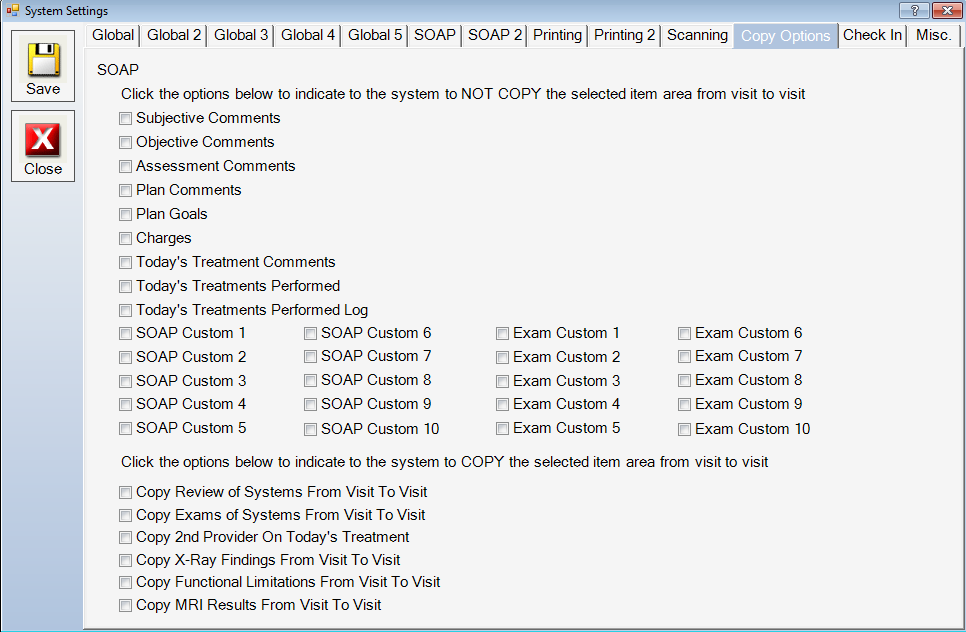
Check the options that you DO NOT want copied from note to note. Once you are done making your changes, click Save, and click Close.
Search Patients By Phone Number - Chirowrite now has the ability to search for patients by phone number. To access this option, click Administration > System Configuration > Defaults > Global 5.
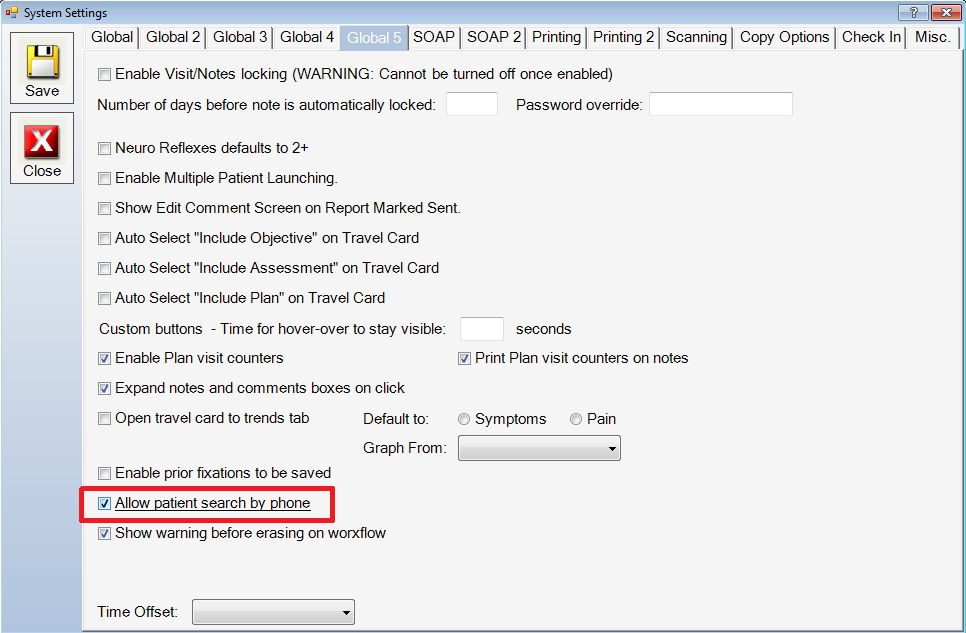
To enable the search patients by phone option, click Allow patient search by phone option. Once you have made you adjustments, click Save, and click Close.
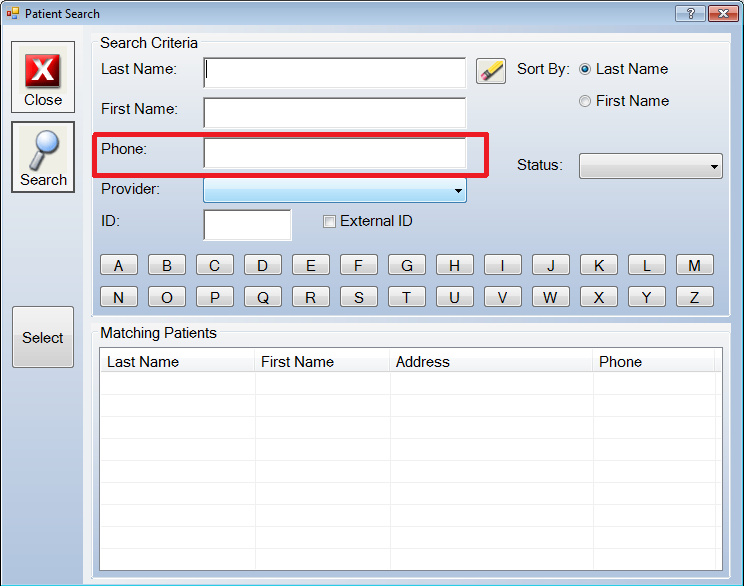
Now the option to search by phone number is present in the search options.
Show Warning Before Erase On Workflow - Chirowrite now has the ability to show a warning before you erase information on a workflow. To enable this option click Administration > System Configuration > Defaults > Global 5.
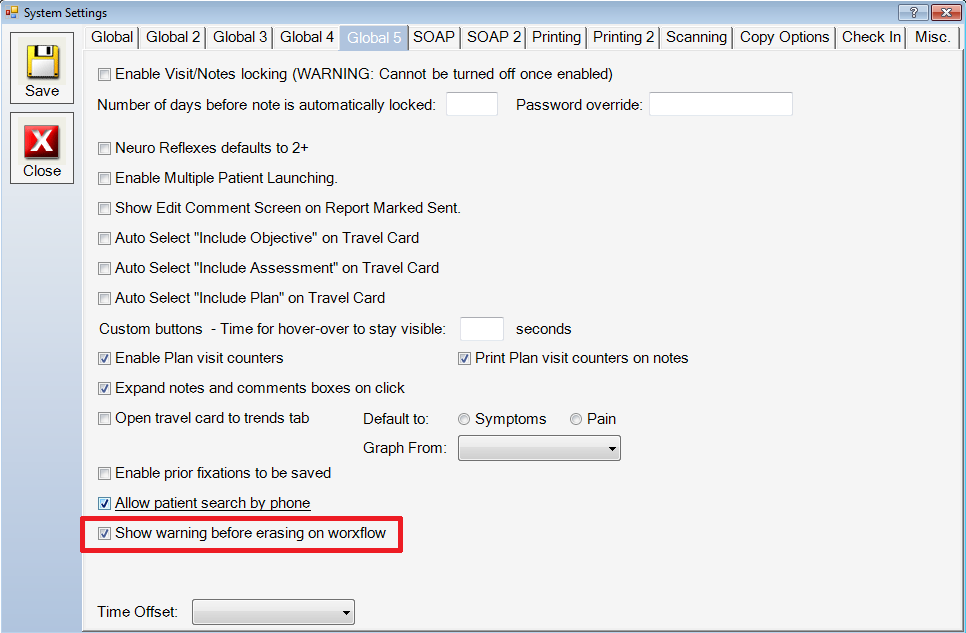
To enable the show warning before erasing on workflow option, check the box for Show warning before erasing on workflow. Once you have made all the necessary adjustments, click Save, and click Close.
Once you have completed these steps, a program restart is required for the option to take effect.
KIOSK
Hide New Patient Opening Screen - Chirowrite now has the ability to let you choose whether to hide or display the opening option screen selecting the nature of injury on the kiosk. To access this option click Administration > System Configuration > Kiosk Settings.

To enable hide new patient options, click the hide new patient options option. Once you have made your adjustments, click Save, and click Close.
Hide Patient Complaint Screen - Chirowrite now has the ability to hide the ability for the patient to add complaints on the kiosk. To access this option click Administration > System Configuration > Kiosk Settings.
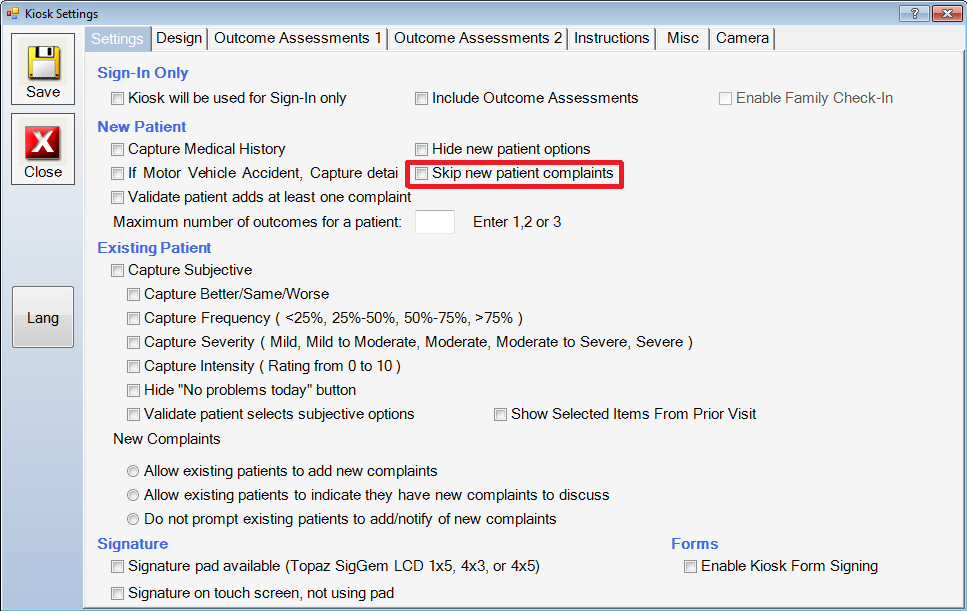
To enable skip new patient complaints, click the skip new patient complaints option. Once you have made your adjustments, click Save, and click Close.
Show Custom History Options - Chirowrite now has the ability to show custom history options that you have added in Chirowrite. To enable this option click Administration > System Configuration > Custom Medical Conditions. Click the condition that you want to display on the kiosk and click Edit.
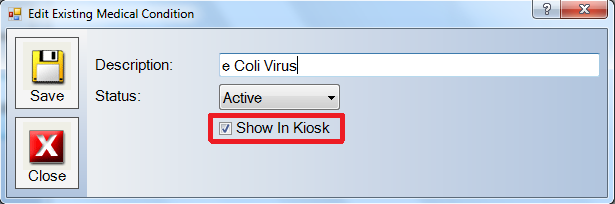
To enable the condition to be displayed in the kiosk, click the show in kiosk option. Once you have made your adjustments, click Save, and click Close.
SCHEDULER
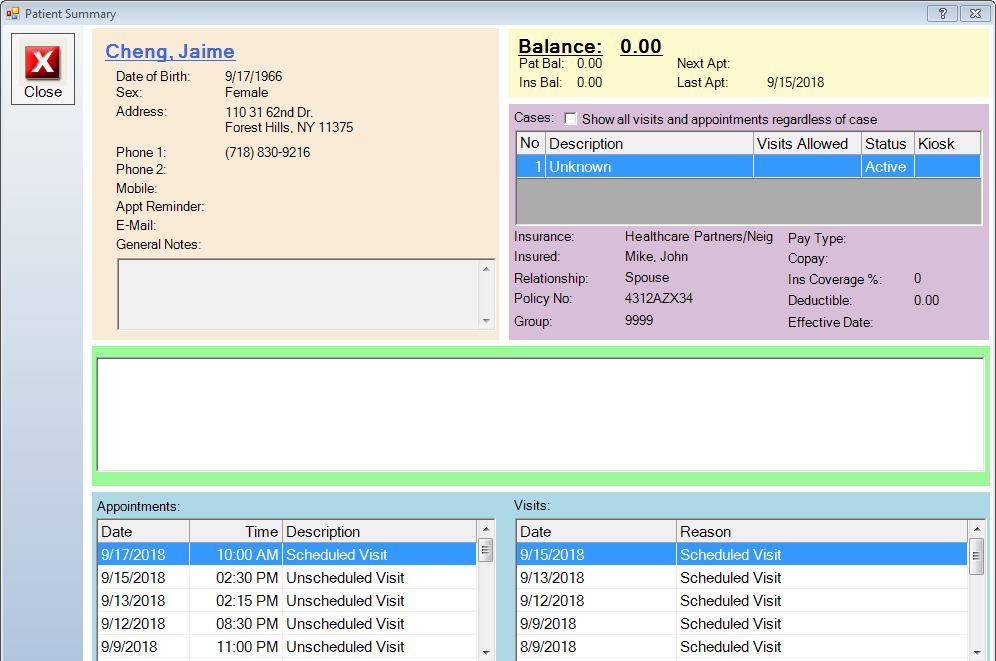
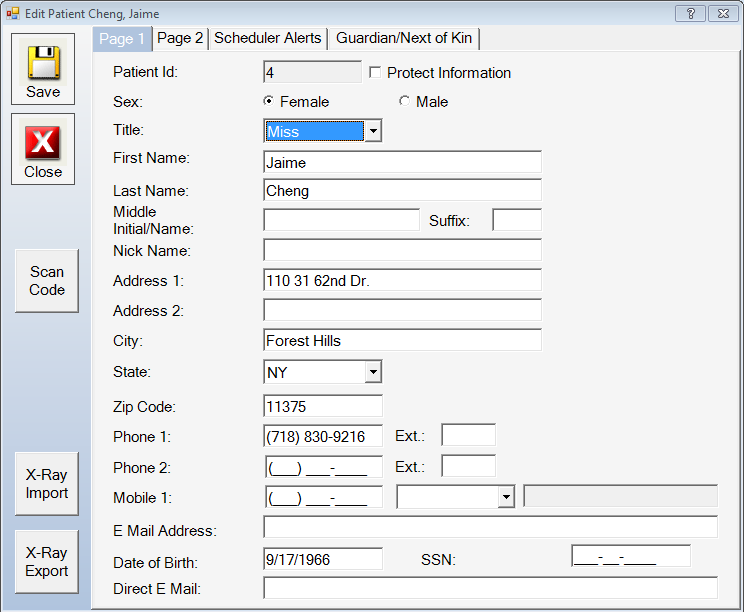
New Patient Summary Window - Chirowrite has redesigned the patient summary window for the scheduler. The new screen has more of the patients information at your disposal. To see the new patient summary window, simply search for a patient in the scheduler.
The patient summary window has two clickable areas to streamline the user experience. The first clickable area is the patient name.
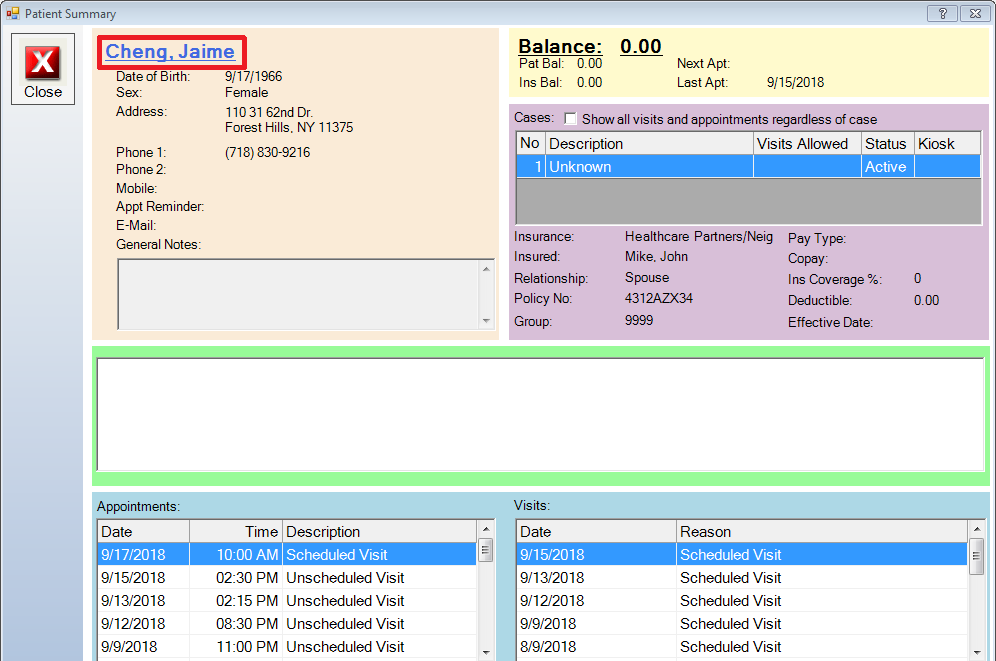
Clicking on the patient name will bring up the patient edit window.
The second clickable area on the patient summary screen is the balance.
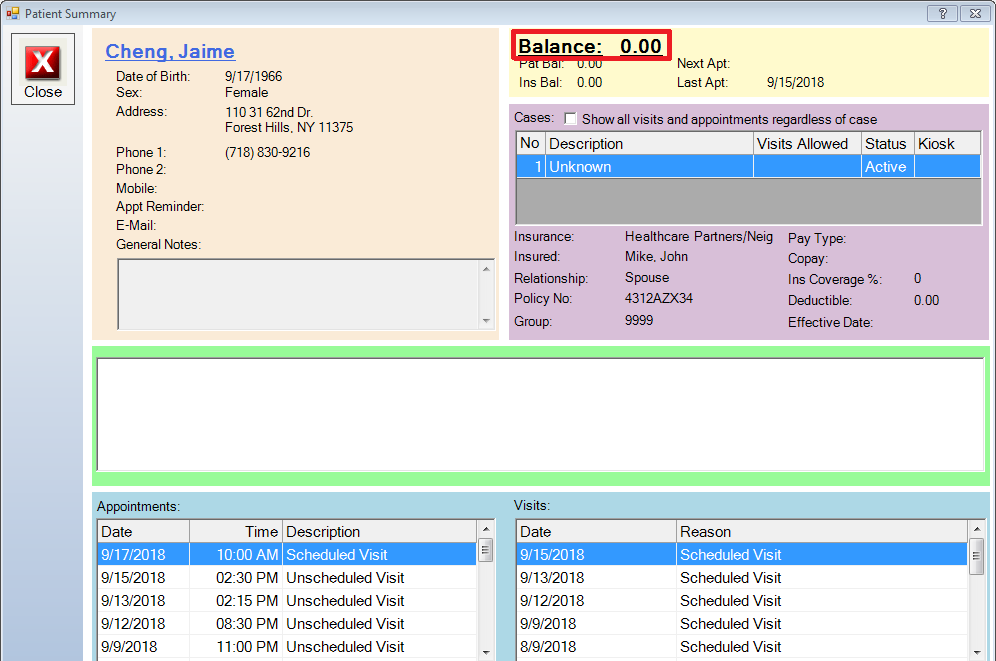
Clicking on the balance will bring up the fee history screen.
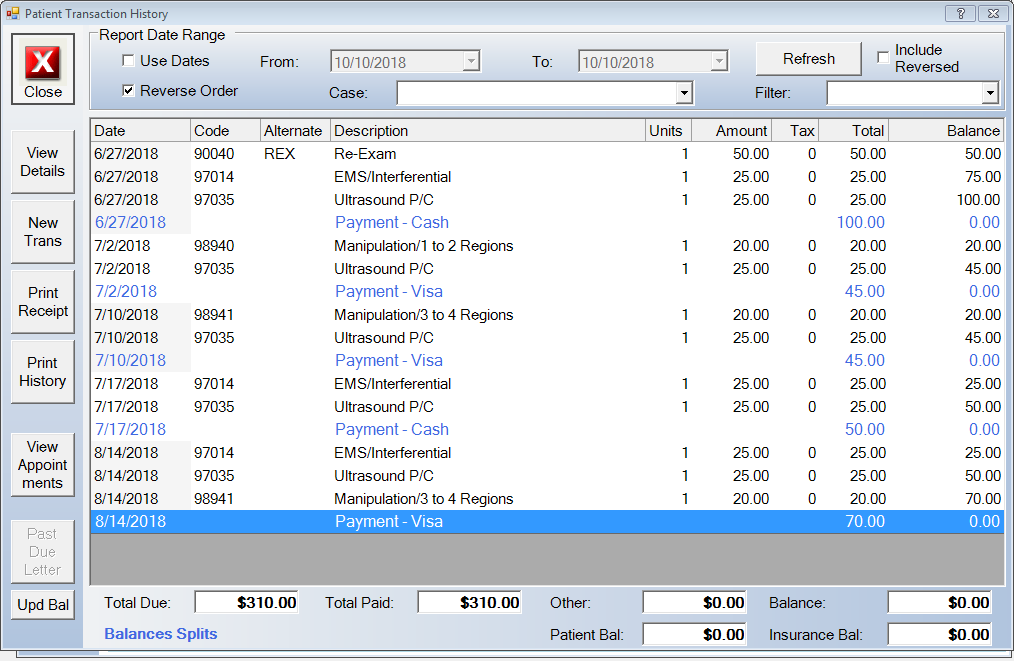
Fee History Overrides - Chirowrite now has the ability to set defaults on fee history overrides. You can access this option on the scheduler by clicking Administration > Schedule > Settings > Misc. 2.
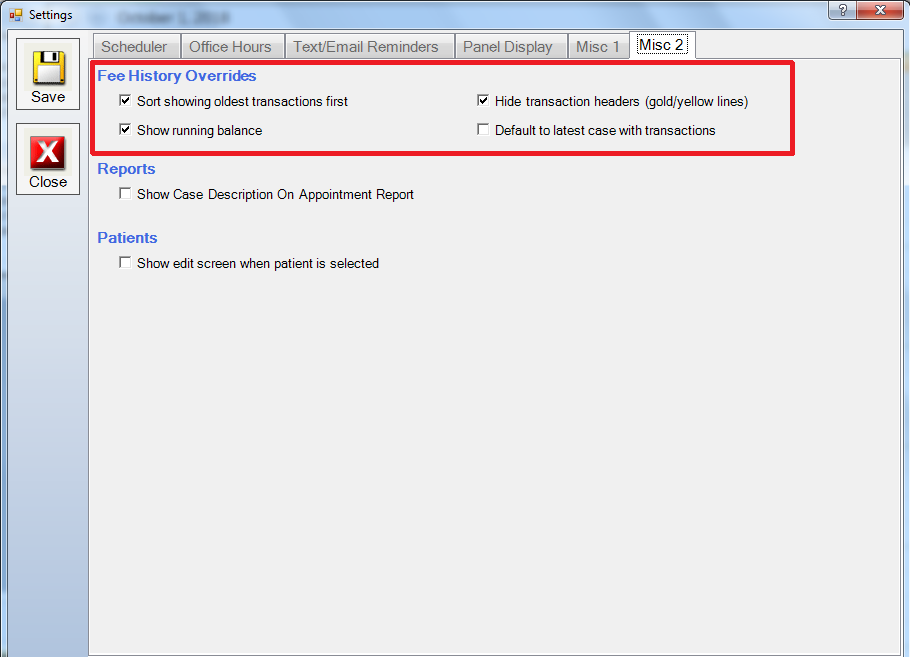
Under this format, the fee history will look like this.
As opposed to if none of the choices are selected, the screen would look like this.

Once you have made your adjustments, click Save, and click Close.
Birthday Reminders - Chirowrite now has the ability to set birthday reminders for patients. You can access this option on the scheduler by clicking Administration > Schedule > Settings.
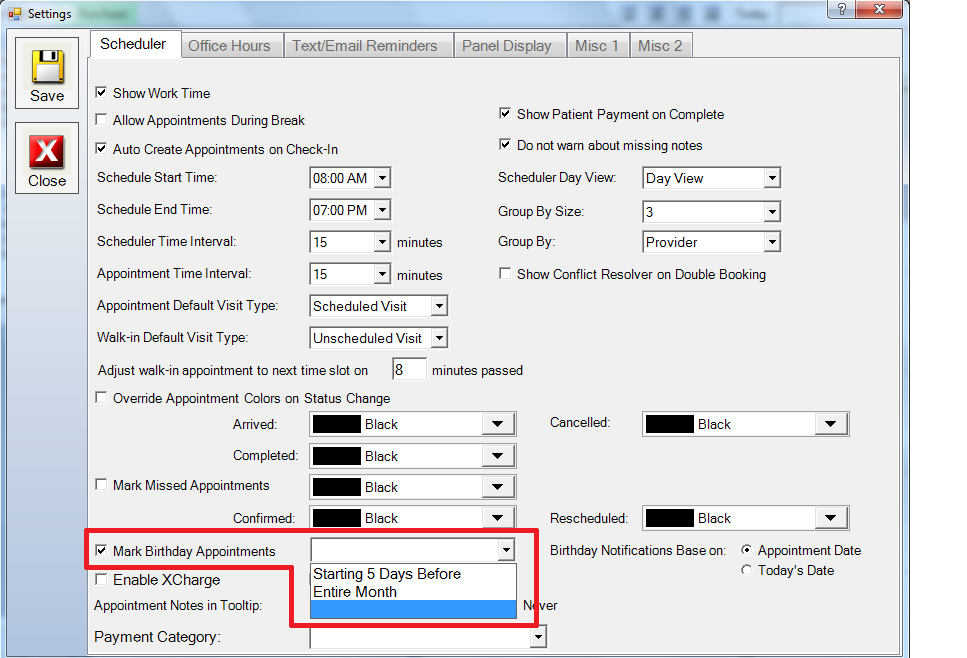
To enable Mark Birthday Appointments, click the Mark Birthday Appointments option. You can then click the drop down menu to the right of this option and choose whether to mark appointments for this patient starting 5 days before, or for the entire month.
Once you have made the necessary adjustments, click Save, and click Close.
You can also choose whether to set birthday notifications based on the appointment date, or todays date. This option is found by clicking Administration > Schedule > Settings.
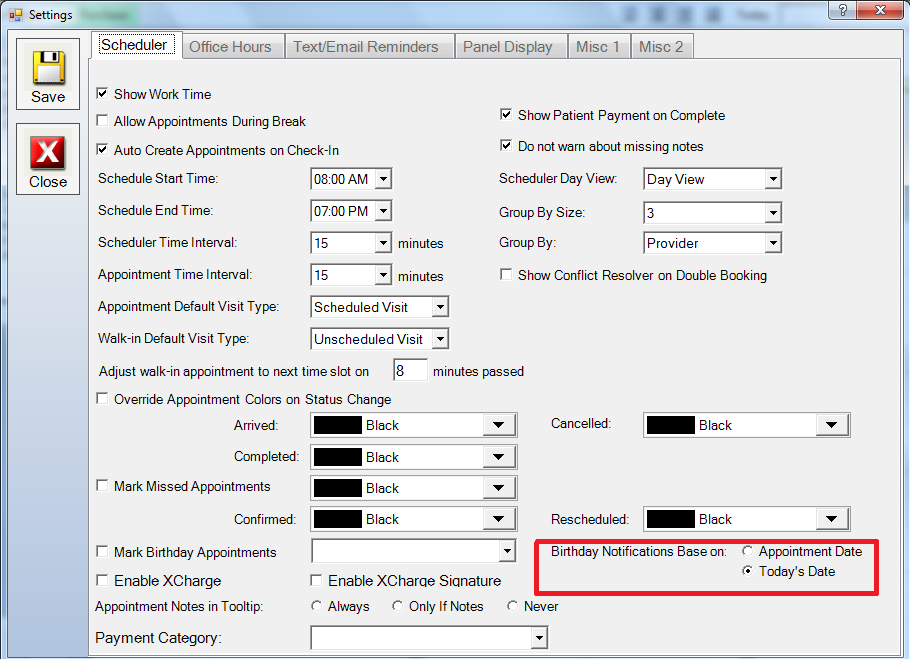
In the Birthday Notifications Base on section, click either the Appointment Date, or the Today's Date option. Once you have made all the necessary adjustments, click Save, and click Close.
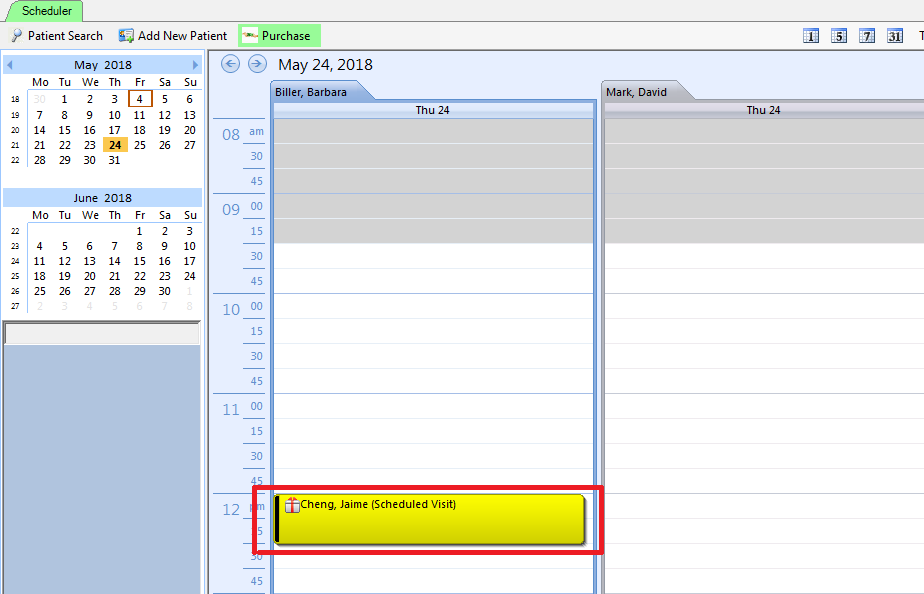
Once you have saved the settings, any patient with a birthday will now have an icon next to the name to signify that.
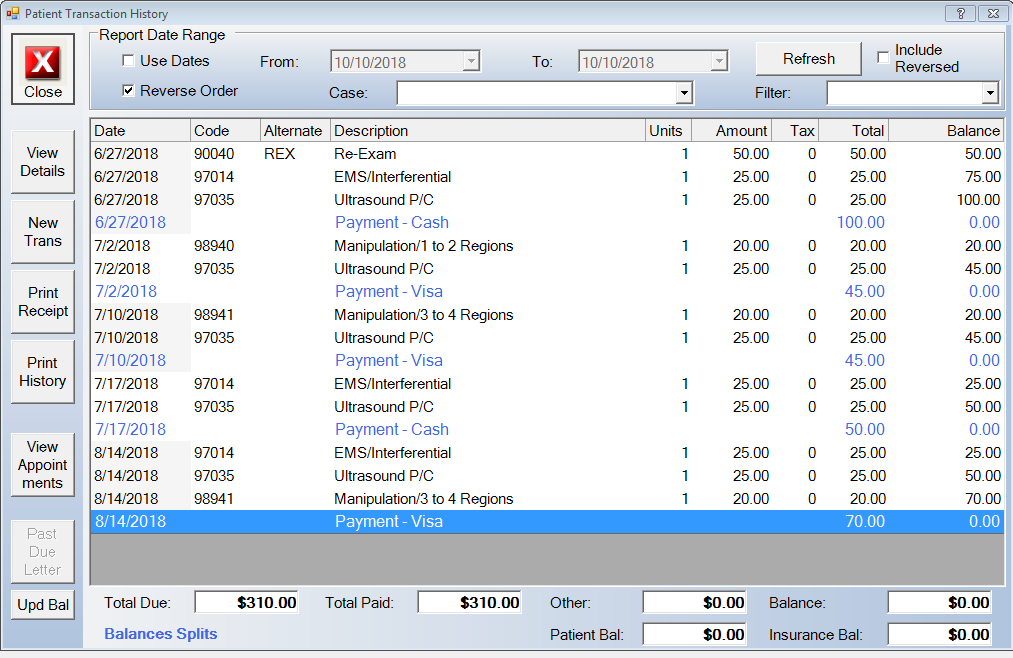
Enhancements To The Payment Screen
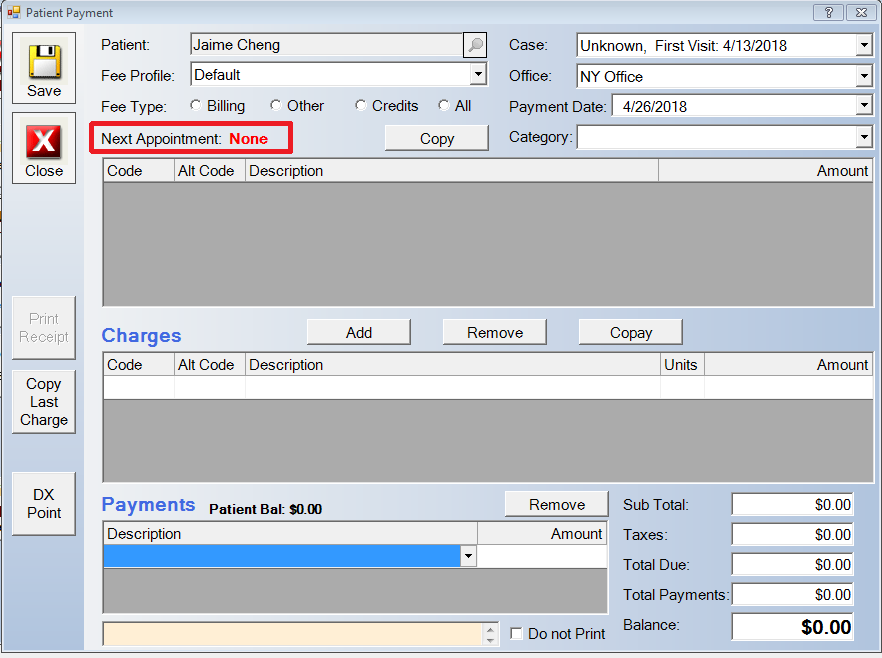
View next appointment date on payment screen - Chirowrite now has the ability to show the next appointment date on the payment screen. This is a default option that will display automatically.
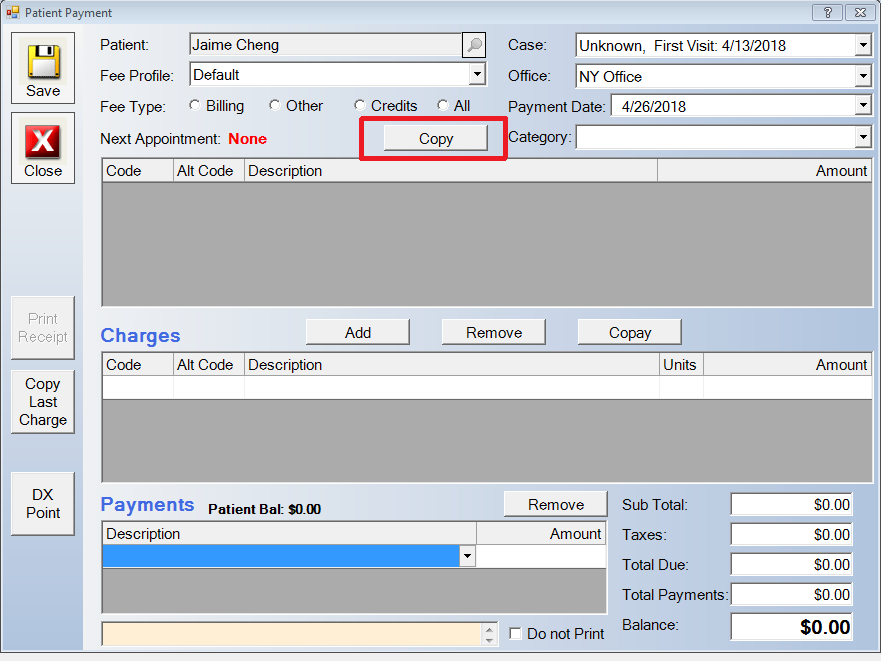
Copy an appointment to paste in scheduler - Chirowrite now has the ability to copy an appointment from the payment screen to be pasted in the calendar at a different time.
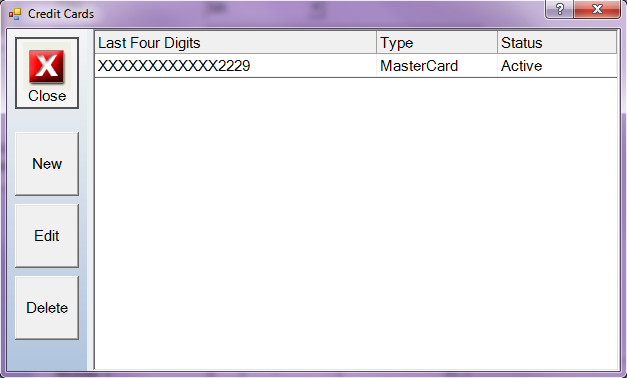
Store Credit Card On File (X-Charge Only) - Chirowrite now has the ability to save credit card information for patients. This is for people who utilize X-Charge only. In order to access this information the patient has to be selected from the patient search. Click Patient Activities > Credit Card.
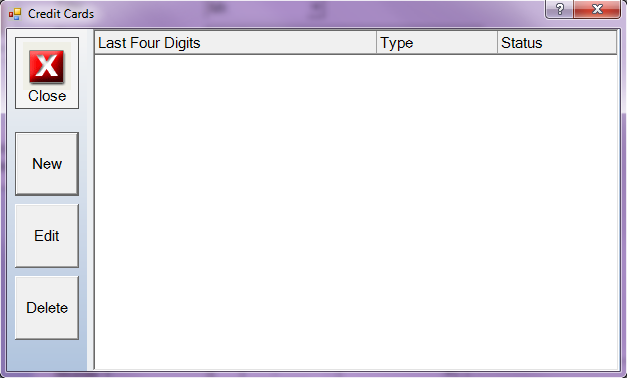
To add a new credit card click New.
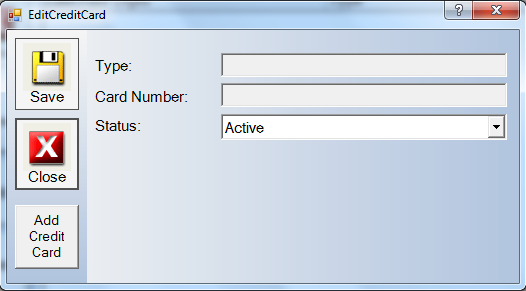
Click Add Credit Card.
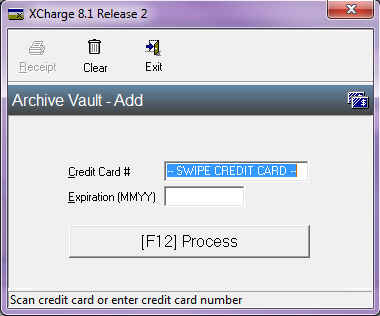
Use your USB card reader to read the credit card information.
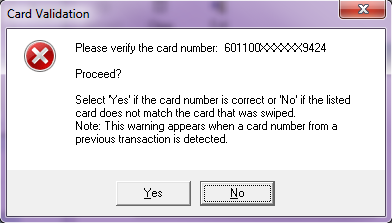
Check to make sure that the credit card number is accurate. If the information is incorrect, click No, and swipe again. If the information is accurate, click Yes.
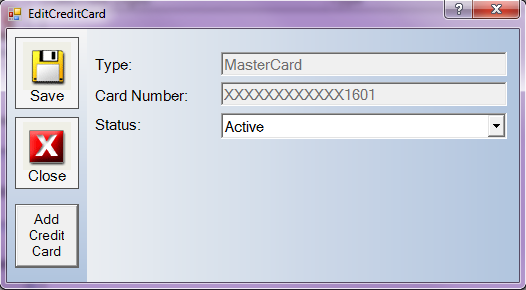
Once the credit card information is in the system, click Save, and click Close.
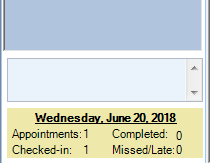
Appointment Stats in Bottom Left Corner - Chirowrite now shows appointment info for the day in the bottom left corner of the scheduler screen.
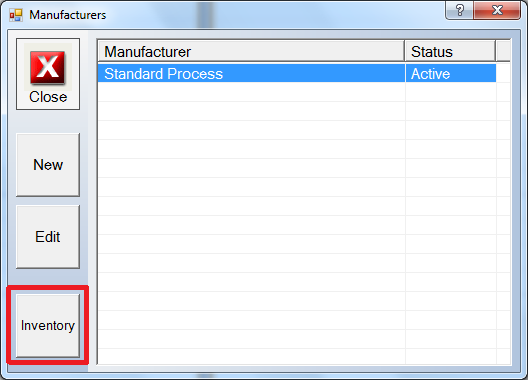
Manufacturers - Chirowrite now has the ability to record manufacturers. If you sell products in your office, recording manufacturers of these products can help to streamline the process of reordering products. To add manufacturers to your list, in the scheduler, click Administration > Manufacturers.
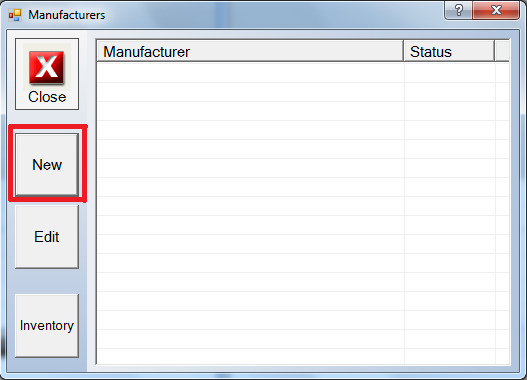
To enter a new manufacturer, click the New button.
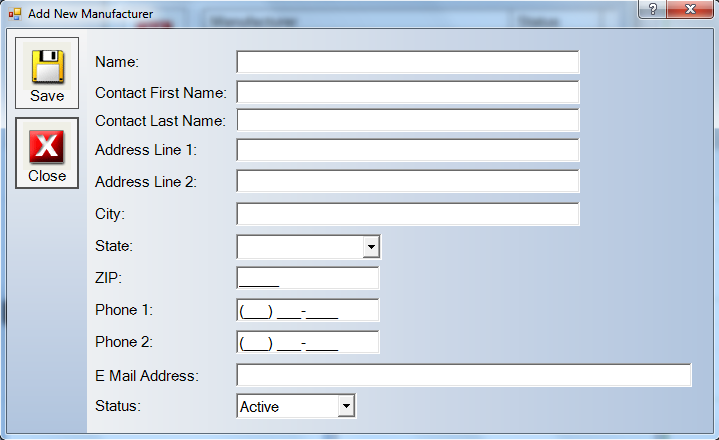
Enter all information for the manufacturer. Once you have completed entering the information, click Save, and click Close.
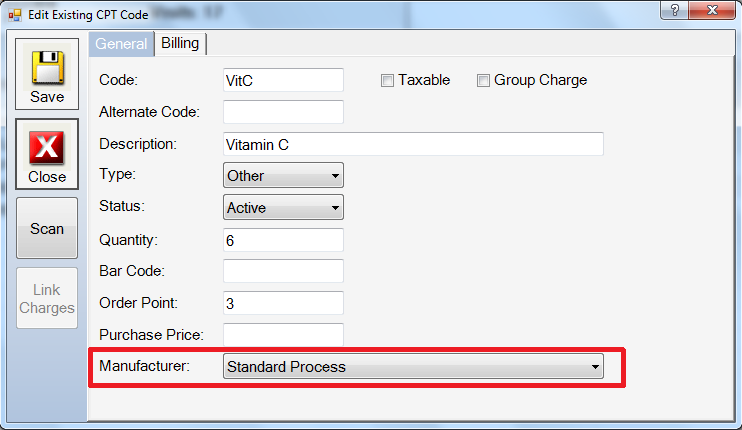
Now you are able to add a manufacturer in the billing code section to products that you sell. In order to do this click Administration > Billing Codes. Select where your products are and click New if you are entering New products, or Edit if you are adding a manufacturer to an existing product.
Once you have made the necessary adjustments click Save, and click Close.
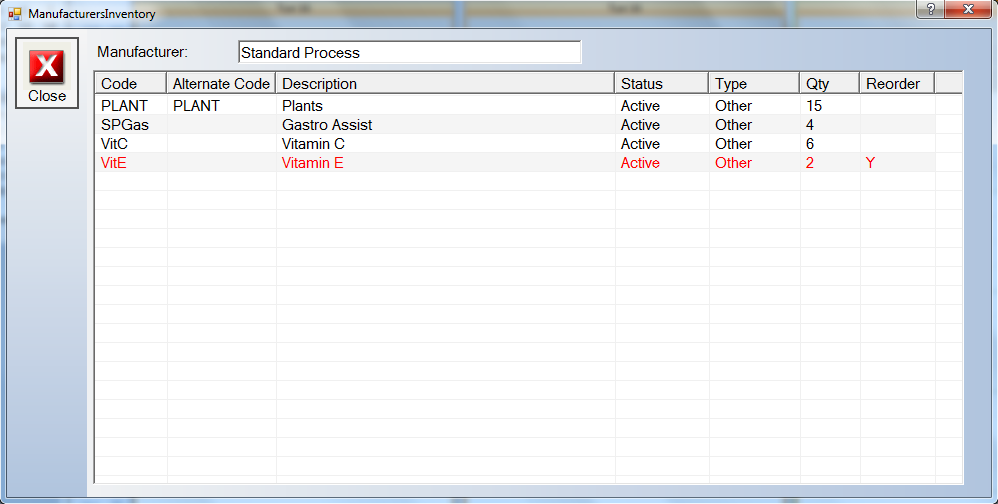
In the scheduler you can now always check the status of your inventory. Click Administration > Manufacturer then click Inventory.
Now you are able to look at what you have in inventory by manufacturer.
Billing
Chirowrite now has the ability to do insurance billing. Chirowrite can print on paper CMS 1500 forms for submission, or electronically submit the CMS 1500 forms to clearing house. If you would like more information on this new feature, you can call us at 407-772-2100 to schedule a live demo.